When you want to implement search in your application, the last thing you should have to worry about is where to put the search box. When you implement search with the Android search framework, you don't have to. When the user invokes search, a search dialog appears at the top of the screen with your application icon to the left of the search box. When the user executes the search, your application receives the query so it can search your application's data. An example of the search dialog is shown in figure 1.
This guide shows you how to set up your application to provide search in the search dialog. When you use the search dialog, you provide a standardized search experience and can add features such as voice search and search suggestions.
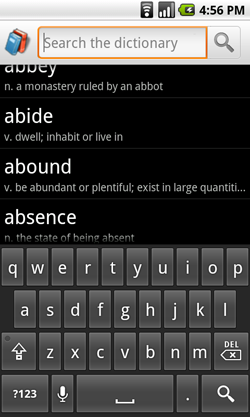
Figure 1. Screenshot of an application's search dialog.
The Android search framework manages the search dialog for your application. You never need
to draw it or worry about where it is, and your Activity is not interrupted when the search dialog
appears. The Search Manager (SearchManager) is the component that does this work
for you. It manages the life of the search dialog and sends your application the user's search
query.
When the user executes a search, the Search Manager creates an Intent to
pass the search query to the Activity that you've declared to handle searches. Basically, all you
need is an Activity that receives the search Intent, performs the search, and presents the results.
Specifically, you need the following:
Activity that receives the search query, then searches your data and
displays the search results.The searchable configuration is an XML file that defines several settings for the search
dialog in your application. This file is traditionally named searchable.xml and must be
saved in the res/xml/ project directory.
The file must consist of the <searchable> element as the root node and specify one
or more attributes that configure your search dialog. For example:
<?xml version="1.0" encoding="utf-8"?>
<searchable xmlns:android="http://schemas.android.com/apk/res/android"
    android:label="@string/app_label"
    android:hint="@string/search_hint" >
</searchable>
The android:label attribute is the only required attribute and points to a string
resource, which should be the same as the application name. This label isn't actually visible to the
user until you enable suggestions for Quick Search Box, at which point, this label is visible in the
list of Searchable items in the system Settings.
Though it's not required, we recommend that you always include the android:hint
attribute, which provides a hint string in the search dialog's text box before the user
enters their query. The hint is important because it provides important clues to users about what
they can search.
Tip: For consistency among other
Android applications, you should format the string for android:hint as "Search
<content-or-product>". For example, "Search songs and artists" or "Search
YouTube".
The <searchable> element accepts several other attributes. Most attributes apply
only when configuring features such as search suggestions and voice search.
For more details about the searchable configuration file, see the Searchable Configuration reference.
When the user executes a search from the search dialog, the Search Manager takes the query
and sends it to your searchable Activity in the ACTION_SEARCH Intent. Your searchable Activity
then searches your data using the query and presents the results to the user.
In order for the Search Manager to know where to deliver the search query, you must declare your searchable Activity in the Android manifest file.
If you don't have one already, create an Activity that performs
searches and present search results. To set up this Activity as your searchable Activity:
ACTION_SEARCH Intent, in an <intent-filter>
element.<meta-data>
element.For example:
<application ... >
    <activity android:name=".MySearchableActivity" >
        <intent-filter>
            <action android:name="android.intent.action.SEARCH" />
        </intent-filter>
        <meta-data android:name="android.app.searchable"
                   android:resource="@xml/searchable"/>
    </activity>
    ...
</application>
The <meta-data> element must include the android:name attribute with a
value of "android.app.searchable" and the android:resource attribute with a
reference to the searchable configuration file (in this example, it
refers to the res/xml/searchable.xml file).
Note: The <intent-filter> does not need a <category> with the
DEFAULT value, because the Search Manager delivers the ACTION_SEARCH Intent explicitly to your searchable Activity by name.
The search dialog is not, by default, available from every Activity of your application. Rather, the search dialog is presented to users only when they invoke search from a searchable context of your application. A searchable context is any Activity for which you have declared searchable meta-data in the manifest file. For example, the searchable Activity itself (declared in the manifest snippet above) is a searchable context because it includes meta-data that defines the searchable configuration. Any other Activity in your application is not a searchable context, by default, and thus, does not reveal the search dialog. However, you probably do want the search dialog available from your other activities (and to launch the searchable Activity when the user executes a search). You can do exactly that.
If you want all of your activities to provide the search dialog, add another <meta-data> element inside the <application> element. Use this element to declare the existing searchable Activity as the
default searchable Activity. For example:
<application ... >
    <activity android:name=".MySearchableActivity" >
        <intent-filter>
            <action android:name="android.intent.action.SEARCH" />
        </intent-filter>
        <meta-data android:name="android.app.searchable"
                   android:resource="@xml/searchable"/>
    </activity>
    <activity android:name=".AnotherActivity" ... >
    </activity>
    <!-- declare the default searchable Activity for the whole app -->
    <meta-data android:name="android.app.default_searchable"
               android:value=".MySearchableActivity" />
    ...
</application>
The <meta-data> element with the android:name attribute value of
"android.app.default_searchable" specifies a default searchable Activity for the context in
which it is placed (which, in this case, is the entire application). The searchable Activity to
use is specified with the android:value attribute. All other activities in the
application, such as AnotherActivity, are now considered a searchable context and can invoke
the search dialog. When a search is executed, MySearchableActivity is launched to handle
the search query.
You can also control which activities provide search at a more granular level.
To specify only an individual Activity as a searchable context, place the <meta-data> with the "android.app.default_searchable" name inside the respective <activity>
element (rather than inside the <application> element). While uncommon, you
can also create more than one searchable Activity and provide each one in different contexts of your
application, either by declaring a different searchable Activity in each <activity>
element, or by declaring a default searchable Activity for the entire application and then
overriding it with a <meta-data> element inside certain activities. (You might do
this if you want to search different sets of data that cannot be handled by the same
searchable Activity, depending on the currently open Activity.)
Once you have declared your searchable Activity, performing a search for the user involves three steps:
Traditionally, your search results should be presented in a ListView, so
you might want your searchable Activity to extend ListActivity, which
provides easy access to ListView APIs. (See the List View Tutorial for a simple
ListActivity sample.)
When a user executes a search from the search dialog, the Search Manager sends the ACTION_SEARCH Intent to your searchable Activity.
This Intent carries the search query in the
QUERY string extra. You must check for
this Intent when the Activity starts and extract the string. For example, here's how you can get the
query when your Activity starts:
@Override
public void onCreate(Bundle savedInstanceState) {
    super.onCreate(savedInstanceState);
    setContentView(R.layout.search);

    Intent intent = getIntent();

    if (Intent.ACTION_SEARCH.equals(intent.getAction())) {
      String query = intent.getStringExtra(SearchManager.QUERY);
      doMySearch(query);
    }
}
The QUERY string is always included with
the ACTION_SEARCH Intent. In this example, the query is
retrieved and passed to a local doMySearch() method where the actual search operation
is done.
The process of storing and searching your data is unique to your application. You can store and search your data in many ways, but this guide does not show you how to store your data and search it. Storing and searching your data is something you should carefully consider in terms of your needs and your data. However, here are some tips you might be able to apply:
SQLiteDatabase class for
information about SQLite on Android. Also look at the Searchable Dictionary sample
application to see a complete SQLite implementation that performs searches with FTS3.android.net for a reference of network APIs and Creating a Progress Dialog to see
how you can display a progress wheel.An Adapter binds individual items from a set of data into individual View objects. When the Adapter
is applied to a ListView, the Views are injected as individual items of the
list. Adapter is simply an interface, so implementations such as CursorAdapter (for binding data from a Cursor) are needed.
If none of the existing implementations work for your data, then you should implement your own from
BaseAdapter. Install the SDK Samples package for API Level 4 to see the
original version of the Searchable Dictionary, which creates a custom BaseAdapter.
Regardless of where your data lives and how you search it, we recommend that you return search
results to your searchable Activity with an Adapter. This way, you can easily
present all the search results in a ListView. If your data comes from a
SQLite database query, then you can apply your results to a ListView
using a CursorAdapter. If your data comes in some other type of format, then
you can create an extension of the BaseAdapter.
Presenting your search results is mostly a UI detail that is not handled by the search APIs.
However, one option is to create your searchable Activity to extend ListActivity and call setListAdapter(ListAdapter), passing it an Adapter that is bound to your data. This injects all the
results into the Activity ListView.
For more help presenting your results, see the ListActivity
documentation.
Also see the Searchable Dictionary sample
for an a complete demonstration of how to search an SQLite database and use an
Adapter to provide results in a ListView.
Once you have a searchable Activity, invoking the search dialog is easy. Many Android devices provide a dedicated SEARCH key, which reveals the search dialog when the user presses it from a searchable context of your application. However, you should not assume that a SEARCH key is available on the user's device and should always provide a search button in your UI that invokes search.
To invoke search from your Activity, call onSearchRequested().
For instance, you should provide a menu item in your Options Menu or a button in your UI to invoke search with this method. The search_icons.zip file includes icons for medium and high density screens, which you can use for your search menu item or button (low density screens automatically scale-down the hdpi image by one half).
You can also enable "type-to-search" functionality, which reveals the search dialog when the
user starts typing on the keyboard and the keystrokes are inserted into the search dialog. You can
enable type-to-search in your Activity by calling
setDefaultKeyMode(DEFAULT_KEYS_SEARCH_LOCAL) during your Activity's
onCreate() method.
The search dialog is a Dialog that floats at the top of the
screen. It does not cause any change in the Activity stack, so when the search dialog appears, no
lifecycle methods for the currently open Activity (such as onPause()) are called. Your Activity just loses input focus as it is given to
the search dialog.
If you want to be notified when search is invoked, override the onSearchRequested() method. When the system calls this method, you can do any
work you want to when your Activity looses input focus to the search dialog (such as pause
animations). Unless you are passing search context data
(discussed below), you should end the method by calling the super class implementation. For
example:
@Override
public boolean onSearchRequested() {
    pauseSomeStuff();
    return super.onSearchRequested();
}
If the user cancels search by pressing the BACK key, the Activity in which search was
invoked re-gains input focus. You can register to be notified when the search dialog is
closed with setOnDismissListener()
and/or setOnCancelListener(). You
should need to register only the OnDismissListener, because it is called every time the search dialog closes. The OnCancelListener only pertains to events in which the
user explicitly exited the search dialog, so it is not called when a search is executed (in which
case, the search dialog naturally disappears).
If the current Activity is not the searchable Activity, then the normal Activity lifecycle
events are triggered once the user executes a search (the current Activity receives onPause() and so forth, as
described in Application
Fundamentals). If, however, the current Activity is the searchable Activity, then one of two
things happens:
ACTION_SEARCH Intent with a call to onCreate() and a new instance of the
Activity is brought to the top of the Activity stack. There are now two instances of your
searchable Activity in the Activity stack (so pressing the BACK key goes back to the previous
instance of the searchable Activity, rather than exiting the searchable Activity).android:launchMode to "singleTop", then the
searchable Activity receives the ACTION_SEARCH Intent with a call
to onNewIntent(Intent), passing the new ACTION_SEARCH Intent here. For example, here's how you might handle
this case, in which the searchable Activity's launch mode is "singleTop":
@Override
public void onCreate(Bundle savedInstanceState) {
    super.onCreate(savedInstanceState);
    setContentView(R.layout.search);
    handleIntent(getIntent());
}

@Override
protected void onNewIntent(Intent intent) {
    setIntent(intent);
    handleIntent(intent);
}

private void handleIntent(Intent intent) {
    if (Intent.ACTION_SEARCH.equals(intent.getAction())) {
      String query = intent.getStringExtra(SearchManager.QUERY);
      doMySearch(query);
    }
}
Compared to the example code in the section about Performing a
Search, all the code to handle the
search Intent is now in the handleIntent() method, so that both onCreate() and onNewIntent() can execute it.
When the system calls onNewIntent(Intent), the Activity has
not been restarted, so the getIntent() method
returns the same Intent that was received with onCreate(). This is why you should call setIntent(Intent) inside onNewIntent(Intent) (so that the Intent saved by the Activity is updated in
case you call getIntent() in the future).
The second scenario using "singleTop" launch mode is usually ideal, because chances are good that once a search is done, the user will perform additional searches and it's a bad experience if your application creates multiple instances of the searchable Activity. So, we recommend that you set your searchable Activity to "singleTop" launch mode in the application manifest. For example:
<activity android:name=".MySearchableActivity"
          android:launchMode="singleTop" >
    <intent-filter>
        <action android:name="android.intent.action.SEARCH" />
    </intent-filter>
    <meta-data android:name="android.app.searchable"
                      android:resource="@xml/searchable"/>
  </activity>
To refine your search criteria from the current Activity instead of depending only on the user's
search query, you can provide additional data in the Intent that the Search Manager sends to your
searchable Activity. In a simple case, you can make your refinements inside the searchable
Activity, for every search made, but if your
search criteria varies from one searchable context to another, then you can pass whatever data
is necessary to refine your search in the APP_DATA Bundle, which is included in the ACTION_SEARCH
Intent.
To pass this kind of data to your searchable Activity, override onSearchRequested() method for the Activity in which search can be invoked.
For example:
@Override
public boolean onSearchRequested() {
     Bundle appData = new Bundle();
     appData.putBoolean(MySearchableActivity.JARGON, true);
     startSearch(null, false, appData, false);
     return true;
 }
Returning "true" indicates that you have successfully handled this callback event. Then in your
searchable Activity, you can extract the data placed inside appdata from the APP_DATA Bundle to refine the search. For example:
Bundle appData = getIntent().getBundleExtra(SearchManager.APP_DATA);
if (appData != null) {
    boolean jargon = appData.getBoolean(MySearchableActivity.JARGON);
}
Caution: Never call the startSearch() method from outside
the onSearchRequested() callback method. To invoke the search dialog
in your Activity, always call onSearchRequested(). Otherwise, onSearchRequested() is not called and customizations (such as the addition of
appData in the above example) are missed.
You can add voice search functionality to your search dialog by adding the android:voiceSearchMode attribute to your searchable configuration. This adds a voice search
button in the search dialog that launches a voice prompt. When the user
has finished speaking, the transcribed search query is sent to your searchable
Activity.
For example:
<?xml version="1.0" encoding="utf-8"?>
<searchable xmlns:android="http://schemas.android.com/apk/res/android"
    android:label="@string/search_label"
    android:hint="@string/search_hint"
    android:voiceSearchMode="showVoiceSearchButton|launchRecognizer" >
</searchable>
The value showVoiceSearchButton is required to enable voice
search, while the second value, launchRecognizer, specifies that the voice search button
should launch a recognizer that returns the transcribed text to the searchable Activity.
You can provide additional attributes to specify the voice search behavior, such as the language to be expected and the maximum number of results to return. See the Searchable Configuration reference for more information about the available attributes.
Note: Carefully consider whether voice search is appropriate for your application. All searches performed with the voice search button are immediately sent to your searchable Activity without a chance for the user to review the transcribed query. Sufficiently test the voice recognition and ensure that it understands the types of queries that the user might submit inside your application.