This documentation provides an early look at the Android Market In-app Billing service. The documentation may change without notice.
In-app billing frees you from processing financial transactions, but you still need to perform a few administrative tasks, including setting up and maintaining your product list on the publisher site, registering test accounts, and handling refunds when necessary.
You must have an Android Market publisher account to set up a product list and register test accounts. And you must have a Google Checkout merchant account to issue refunds to your users. If you already have a publisher account on Android Market, you can use your existing account. You do not need to register for a new account to support in-app billing. If you do not have a publisher account, you can register as an Android Market developer and set up a publisher account at the Android Market publisher site. If you do not have a Google Checkout merchant account, you can register for one at the Google Checkout site.
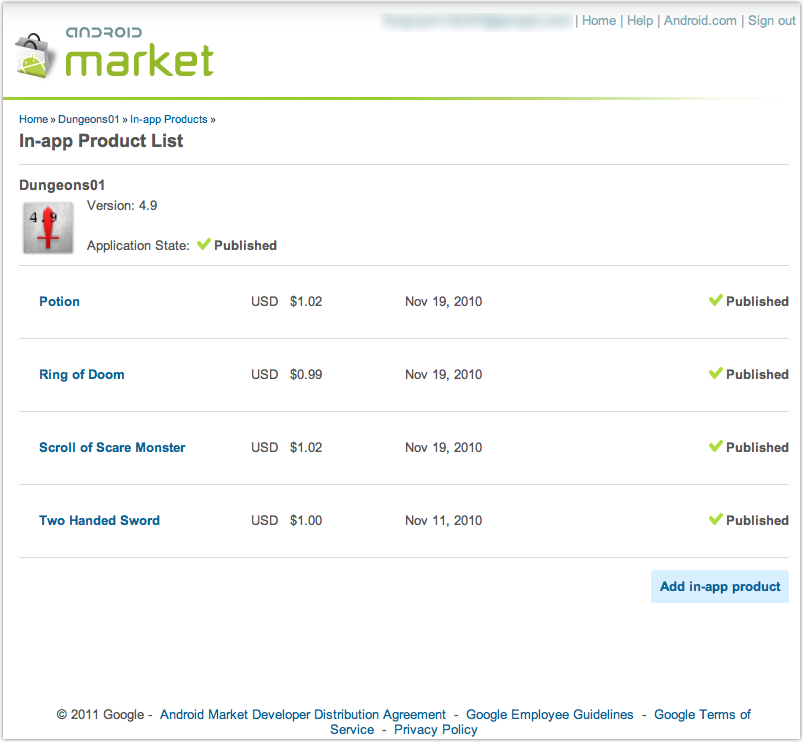
The Android Market publisher site provides a product list for each of your published applications. You can sell an item using the in-app billing feature only if the item is listed on an application's product list. Each application has its own product list; you cannot sell items that are listed in another application's product list.
A product list contains information about the items you are selling, such as a product id, product description, and price (see figure 1). The product list stores only metadata about the items you are selling in your application. It does not store any digital content. You are responsible for storing and delivering the digital content that you sell in your applications.
You can create a product list for a published application or a draft application that's been uploaded and saved to the Android Market site. However, the application's manifest must include the com.android.vending.BILLING permission. If an application's manifest does not include this permission, you will be able to edit existing items in the product list but you will not be able to add new items to the list. For more information, see Modifying your application's AndroidManifest.xml file.
To create a product list for an application, follow these steps:
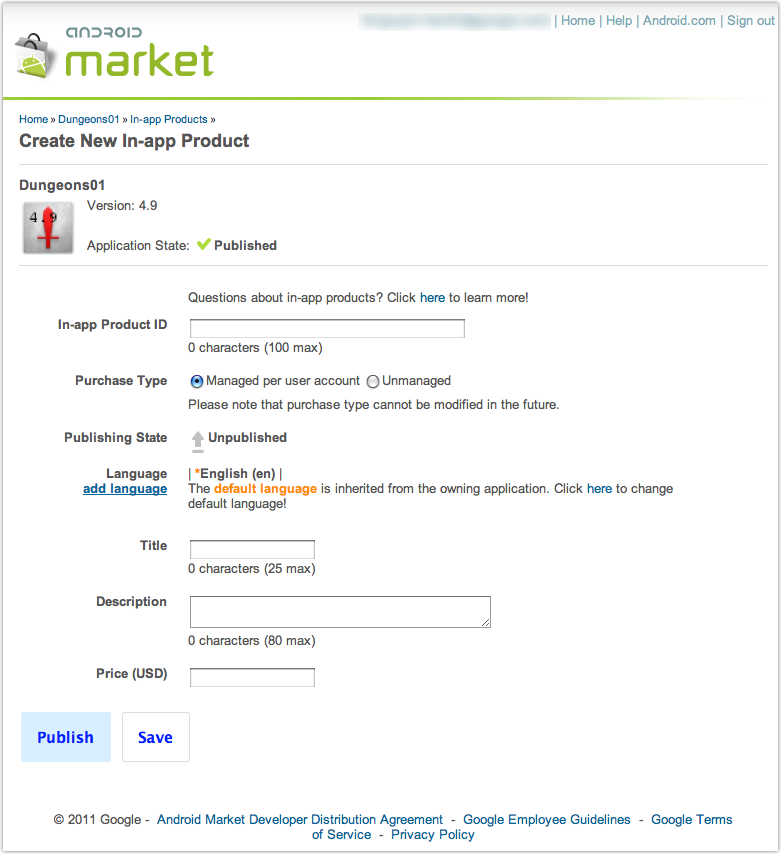
You must enter the following information for each item in a product list:
Product IDs are unique across an application's namespace. A product ID must start with a lowercase letter or a number, and must be composed using only lowercase letters (a-z), numbers (0-9), underlines (_), and dots (.). The product ID "android.test" is reserved, as are all product IDs that start with "android.test."
In addition, you cannot modify an item's product ID after it is created, and you cannot reuse a product ID, even if you delete the item previously using the product ID.
The purchase type can be "managed per user account" or "unmanaged." You can specify an item's purchase type only through the publisher site and you can never change an item's purchase type once you specify it. For more information, see Choosing a purchase type later in this document.
An item's publishing state can be "published" or "unpublished." However, to be visible to a user during checkout, an item's publishing state must be set to "published" and the item's application must be published on Android Market. (Note: This is not true for test accounts: that is, an item is visible to a trusted tester if the application is not published and the item is published. See Testing In-app Billing for more information.)
A product list inherits its language from the parent application.
The title is a short descriptor for the item. For example, "sleeping potion." Titles must be unique across an application's namespace. Every item must have a title. The title is visible to users during checkout.
The description is a long descriptor for the item. For example, "Instantly puts creatures to sleep. Does not work on angry elves." Every item must have a description. The description is visible to users during checkout.
Every item must have a price greater than zero; you cannot sell free items.
Note: Be sure to plan your product ID namespace. You cannot reuse or modify product IDs after you save them.
An item's purchase type controls how Android Market manages the purchase of the item. There are two purchase types: "managed per user account" and "unmanaged."
Items that are managed per user account can be purchased only once per user account. When an item is managed per user account, Android Market permanently stores the transaction information for each item on a per-user basis. This enables you to query Android Market with the RESTORE_TRANSACTIONS request and restore the state of the items a specific user has purchased.
If a user attempts to purchase a managed item that has already been purchased, Android Market displays an "Item already purchased" error. This occurs during checkout, when Android Market displays the price and description information on the checkout page. When the user dismisses the error message, the checkout page disappears and the user returns to your user interface. As a best practice, your application should prevent the user from seeing this error. The sample application demonstrates how you can do this by keeping track of items that are managed and already purchased and not allowing users to select those items from the list. Your application should do something similar—either graying out the item or hiding it so that it cannot be selected.
The "manage by user account" purchase type is useful if you are selling items such as game levels or application features. These items are not transient and usually need to be restored whenever a user reinstalls your application, wipes the data on their device, or installs your application on a new device.
Items that are unmanaged do not have their transaction information stored on Android Market, which means you cannot query Android Market to retrieve transaction information for items whose purchase type is listed as unmanaged. You are responsible for managing the transaction information of unmanaged items. Also, unmanaged items can be purchased multiple times as far as Android Market is concerned, so it's also up to you to control how many times an unmanaged item can be purchased.
The "unmanaged" purchase type is useful if you are selling consumable items, such as fuel or magic spells. These items are consumed within your application and are usually purchased multiple times.
The in-app billing feature does not allow users to send a refund request to Android Market. Refunds for purchases that were made with the in-app billing feature must be directed to you (the application developer). You can then process the refund through your Google Checkout merchant account. When you do this, Android Market receives a refund notification from Google Checkout, and Android Market sends a refund message to your application. Your application can handle this message the same way it handles the response from an application-initiated REQUEST_PURCHASE message so that ultimately your application receives a purchase state change message that includes information about the item that's been refunded.
The Android Market publisher site lets you set up one or more test accounts. A test account is a regular Google account that you register on the publisher site as a test account. Test accounts are authorized to make in-app purchases from applications that you have uploaded to the Android Market site but have not yet published.
You can use any Google account as a test account. Test accounts are useful if you want to let multiple people test in-app billing on applications without giving them access to your publisher account's sign-in credentials. If you want to own and control the test accounts, you can create the accounts yourself and distribute the credentials to your developers or testers.
Test accounts have three limitations:
To add test accounts to your publisher account, follow these steps:
If you have questions or encounter problems while implementing in-app billing, contact the support resources listed in the following table (see table 2). By directing your queries to the correct forum, you can get the support you need more quickly.
Table 2. Developer support resources for Android Market in-app billing.
| Support Type | Resource | Range of Topics |
|---|---|---|
| Development and testing issues | Google Groups: android-developers | In-app billing integration questions, user experience ideas, handling of responses, obfuscating code, IPC, test environment setup. |
| Stack Overflow: http://stackoverflow.com/questions/tagged/android | ||
| Accounts, publishing, and deployment issues | Android Market Help Forum | Publisher accounts, Android Market key pair, test accounts, server responses, test responses, application deployment and results. |
| Market billing issue tracker | Market billing project issue tracker | Bug and issue reports related specifically to in-app billing sample code. |
For general information about how to post to the groups listed above, see Developer Forums document in the Resources tab.