This documentation provides an early look at the Android Market In-app Billing service. The documentation may change without notice.
The Android Market In-app Billing service provides a straightforward, simple interface for sending in-app billing requests and managing in-app billing transactions using Android Market. This document helps you implement in-app billing by stepping through the primary implementation tasks, using the in-app billing sample application as an example.
Before you implement in-app billing in your own application, be sure that you read Overview of In-app Billing and Security and Design. These documents provide background information that will make it easier for you to implement in-app billing.
To implement in-app billing in your application, you need to do the following:
MarketBillingService so your application can send billing requests and receive billing responses from the Android Market application.The in-app billing sample application shows you how to perform several tasks that are common to all in-app billing implementations, including:
The sample application includes an application file (Dungeons.javaMarketBillingService (IMarketBillingService.aidl), and several classes that demonstrate in-app billing messaging. It also includes a class that demonstrates basic security tasks, such as signature verification.
Table 1 lists the source files that are included with the sample application.
Table 1. In-app billing sample application source files.
| File | Description |
|---|---|
| IMarketBillingService.aidl | Android Interface Definition Library (AIDL) file that defines the IPC interface to the Android Market in-app billing service (MarketBillingService). |
| Dungeons.java | Sample application file that provides a UI for making purchases and diplaying purchase history. |
| PurchaseDatabase.java | A local database for storing purchase information. |
| BillingReceiver.java | A BroadcastReceiver that receives asynchronous response messages (broadcast intents) from Android Market. Forwards all messages to the BillingService. |
| BillingService.java | A Service that sends messages to Android Market on behalf of the application by connecting (binding) to the MarketBillingService. |
| ResponseHandler.java | A Handler that contains methods for updating the purchases database and the UI. |
| PurchaseObserver.java | An abstract class for observing changes related to purchases. |
| Security.java | Provides various security-related methods. |
| Consts.java | Defines various Android Market constants and sample application constants. All constants that are defined by Android Market must be defined the same way in your application. |
| Base64.java and Base64DecoderException.java | Provides conversion services from binary to Base64 encoding. The Security class relies on these utility classes. |
The in-app billing sample application is available as a downloadable component of the Android SDK. To download the sample application component, launch the Android SDK and AVD Manager and then select the "Market Billing package, revision 1" component (see figure 1), and click Install Selected to begin the download.
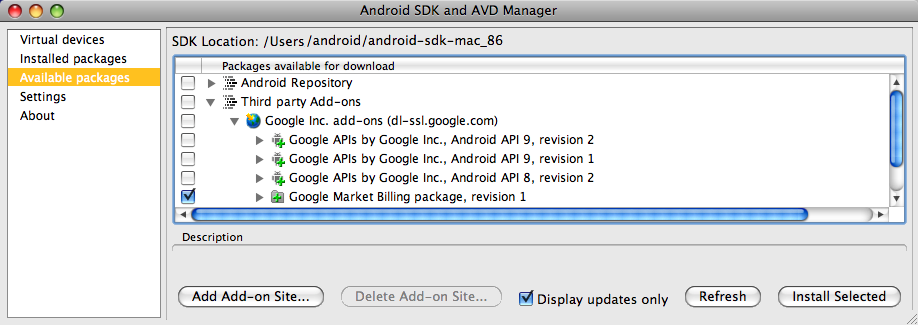
When the download is complete, the Android SDK and AVD Manager saves the component into the following directory:
<sdk>/google-market_billing/
The sample application contains an Android Interface Definition Language (AIDL) file, which defines the interface to the Android Market in-app billing service MarketBillingService). When you add this file to your project, the Android build environment creates an interface file (IMarketBillingService.java). You can then use this interface to make billing requests by invoking IPC method calls.
If you are using the ADT plug-in with Eclipse, you can just add this file to your /src directory. Eclipse will automatically generate the interface file when you build your project (which should happen immediately). If you are not using the ADT plug-in, you can put the AIDL file into your project and use the Ant tool to build your project so that the IMarketBillingService.java file gets generated.
To add the IMarketBillingService.aidl file to your project, do the following:
/src directory:
com/android/vending/billing/
IMarketBillingService.aidl file into the sample/src/com/android/vending/billing/ directory.You should now find a generated interface file named IMarketBillingService.javagen folder of your project.
In-app billing relies on the Android Market application, which handles all communication between your application and the Android Market server. To use the Android Market application, your application must request the proper permission. You can do this by adding the com.android.vending.BILLING permission to your AndroidManifest.xml file. If your application does not declare the in-app billing permission, but attempts to send billing requests, Android Market will refuse the requests and respond with a RESULT_DEVELOPER_ERROR response code.
In addition to the billing permission, you need to declare the BroadcastReceiver that you will use to receive asynchronous response messages (broadcast intents) from Android Market, and you need to declare the Service that you will use to bind with the IMarketBillingService and send messages to Android Market. You must also declare intent filters for the BroadcastReceiver so that the Android system knows how to handle broadcast intents that are sent from the Android Market application.
For example, here's how the in-app billing sample application declares the billing permission, the BroadcastReceiver, the Service, and the intent filters. In the sample application, BillingReceiver is the BroadcastReceiver that handles broadcast intents from the Android Market application and BillingService is the Service that sends requests to the Android Market application.
<?xml version="1.0" encoding="utf-8"?>
<manifest xmlns:android="http://schemas.android.com/apk/res/android"
  package="com.example.dungeons"
  android:versionCode="1"
  android:versionName="1.0">

  <uses-permission android:name="com.android.vending.BILLING" />

  <application android:icon="@drawable/icon" android:label="@string/app_name">
    <activity android:name=".Dungeons" android:label="@string/app_name">
      <intent-filter>
        <action android:name="android.intent.action.MAIN" />
        <category android:name="android.intent.category.LAUNCHER" />
      </intent-filter>
    </activity>

    <service android:name="BillingService" />

    <receiver android:name="BillingReceiver">
      <intent-filter>
        <action android:name="com.android.vending.billing.IN_APP_NOTIFY" />
        <action android:name="com.android.vending.billing.RESPONSE_CODE" />
        <action android:name="com.android.vending.billing.PURCHASE_STATE_CHANGED" />
      </intent-filter>
    </receiver>

  </application>
</manifest>
Your application must have a local Service to facilitate messaging between your application and Android Market. At a minimum, this service must do the following:
MarketBillingService.
CHECK_BILLING_SUPPORTED requestsREQUEST_PURCHASE requestsGET_PURCHASE_INFORMATION requestsCONFIRM_NOTIFICATIONS requestsRESTORE_TRANSACTIONS requestsBinding to the MarketBillingService is relatively easy if you've already added the IMarketBillingService.aidl file to your project. The following code sample shows how to use the bindService() method to bind a service to the MarketBillingService. You could put this code in your service's onCreate() method.
try {
  boolean bindResult = mContext.bindService(
    new Intent("com.android.vending.billing.MarketBillingService.BIND"), this, Context.BIND_AUTO_CREATE);
  if (bindResult) {
    Log.i(TAG, "Service bind successful.");
  } else {
    Log.e(TAG, "Could not bind to the MarketBillingService.");
  }
} catch (SecurityException e) {
  Log.e(TAG, "Security exception: " + e);
}
After you bind to the service, you need to create a reference to the IMarketBillingService interface so you can make billing requests via IPC method calls. The following code shows you how to do this using the onServiceConnected() callback method.
/**
  * The Android system calls this when we are connected to the MarketBillingService.
  */
  public void onServiceConnected(ComponentName name, IBinder service) {
    Log.i(TAG, "MarketBillingService connected.");
    mService = IMarketBillingService.Stub.asInterface(service);
  }
You can now use the mService reference to invoke the sendBillingRequest() method.
For a complete implementation of a service that binds to the MarketBillingService, see the BillingService class in the sample application.
Now that your Service has a reference to the IMarketBillingService interface, you can use that reference to send billing requests (via IPC method calls) to the MarketBillingService. The MarketBillingService IPC interface exposes a single public method (sendBillingRequest()), which takes a single Bundle parameter. The Bundle that you deliver with this method specifies the type of request you want to perform, using various key-value pairs. For instance, one key indicates the type of request you are making, another indicates the item being purchased, and another identifies your application. The sendBillingRequest() method immediately returns a Bundle containing an initial response code. However, this is not the complete purchase response; the complete response is delivered with an asynchronous broadcast intent. For more information about the various Bundle keys that are supported by the MarketBillingService, see In-app Billing Service Interface.
You can use the sendBillingRequest() method to send five types of billing requests. The five request types are specified using the BILLING_REQUEST Bundle key. This Bundle key can have the following five values:
CHECK_BILLING_SUPPORTED—verifies that the Android Market application supports in-app billing.REQUEST_PURCHASE—sends a purchase request for an in-app item.GET_PURCHASE_INFORMATION—retrieves transaction information for a purchase or refund.CONFIRM_NOTIFICATIONS—acknowledges that you received the transaction information for a purchase or refund.RESTORE_TRANSACTIONS—retrieves a user's transaction history for managed purchases.To make any of these billing requests, you first need to build an initial Bundle that contains the three keys that are required for all requests: BILLING_REQUEST, API_VERSION, and PACKAGE_NAME. The following code sample shows you how to create a helper method named makeRequestBundle() that does this.
protected Bundle makeRequestBundle(String method) {
  Bundle request = new Bundle();
  request.putString(BILLING_REQUEST, method);
  request.putInt(API_VERSION, 1);
  request.putString(PACKAGE_NAME, getPackageName());
  return request;
To use this helper method, you pass in a String that corresponds to one of the five types of billing requests. The method returns a Bundle that has the three required keys defined. The following sections show you how to use this helper method when you send a billing request.
Important: You must make all in-app billing requests from your application's main thread.
The following code sample shows how to verify whether the Android Market application supports in-app billing. In the sample, mService is an instance of the MarketBillingService interface.
/**
* Request type is CHECK_BILLING_SUPPORTED
*/
  Bundle request = makeRequestBundle("CHECK_BILLING_SUPPORTED");
  Bundle response = mService.sendBillingRequest(request);
  // Do something with this response.
}
The makeRequestBundle() method constructs an initial Bundle, which contains the three keys that are required for all requests: BILLING_REQUEST, API_VERSION, and PACKAGE_NAME. The request returns a synchronous Bundle response, which contains only a single key: RESPONSE_CODE. The RESPONSE_CODE key can have the following values:
RESULT_OK—in-app billing is supported.RESULT_BILLING_UNAVAILABLE—in-app billing is not supported or the in-app billing API version you specified is not recognized.RESULT_ERROR—there was an error connecting with the Android Market appliction.RESULT_DEVELOPER_ERROR—the application is trying to make an in-app billing request but the application has not declared the com.android.vending.BILLING permission in its manifest. Can also indicate that an application is not properly signed, or that you sent a malformed request.The CHECK_BILLING_SUPPORTED request does not trigger any asynchronous responses (broadcast intents).
To make a purchase request you must do the following:
REQUEST_PURCHASE request.PendingIntent that is returned from the Android Market application.You must specify four keys in the request Bundle. The following code sample shows how to set these keys and make a purchase request for a single in-app item. In the sample, mProductId is the Android Market product ID of an in-app item (which is listed in the application's product list), and mService is an instance of the MarketBillingService interface.
/**
* Request type is REQUEST_PURCHASE
*/
  Bundle request = makeRequestBundle("REQUEST_PURCHASE");
  request.putString(ITEM_ID, mProductId);
  // Note that the developer payload is optional.
  if (mDeveloperPayload != null) {
    request.putString(DEVELOPER_PAYLOAD, mDeveloperPayload);
  Bundle response = mService.sendBillingRequest(request);
  // Do something with this response.
  }
The makeRequestBundle() method constructs an initial Bundle, which contains the three keys that are required for all requests: BILLING_REQUEST, API_VERSION, and PACKAGE_NAME. The ITEM_ID key is then added to the Bundle prior to invoking the sendBillingRequest() method.
The request returns a synchronous Bundle response, which contains three keys: RESPONSE_CODE, PURCHASE_INTENT, and REQUEST_ID. The RESPONSE_CODE key provides you with the status of the request and the REQUEST_ID key provides you with a unique request identifier for the request. The PURCHASE_INTENT key provides you with a PendingIntent, which you can use to launch the checkout UI.
How you use the pending intent depends on which version of Android a device is running. On Android 1.6, you must use the pending intent to launch the checkout UI in its own separate task instead of your application's activity stack. On Android 2.0 and higher, you can use the pending intent to launch the checkout UI on your application's activity stack. The following code shows you how to do this. You can find this code in the PurchaseObserver.java file in the sample application.
void startBuyPageActivity(PendingIntent pendingIntent, Intent intent) {
  if (mStartIntentSender != null) {
    // This is on Android 2.0 and beyond.  The in-app checkout page activity
    // will be on the activity stack of the application.
    try {
      // This implements the method call:
      // mActivity.startIntentSender(pendingIntent.getIntentSender(),
      //     intent, 0, 0, 0);
      mStartIntentSenderArgs[0] = pendingIntent.getIntentSender();
      mStartIntentSenderArgs[1] = intent;
      mStartIntentSenderArgs[2] = Integer.valueOf(0);
      mStartIntentSenderArgs[3] = Integer.valueOf(0);
      mStartIntentSenderArgs[4] = Integer.valueOf(0);
      mStartIntentSender.invoke(mActivity, mStartIntentSenderArgs);
    } catch (Exception e) {
      Log.e(TAG, "error starting activity", e);
      }
  } else {
    // This is on Android 1.6. The in-app checkout page activity will be on its
    // own separate activity stack instead of on the activity stack of
    // the application.
    try {
      pendingIntent.send(mActivity, 0 /* code */, intent);
    } catch (CanceledException e) {
      Log.e(TAG, "error starting activity", e);
      }
  }
}
You must launch the pending intent from an activity context and not an application context.
A REQUEST_PURCHASE request also triggers two asynchronous responses (broadcast intents). First, the Android Market application sends an ACTION_RESPONSE_CODE broadcast intent, which provides error information about the request. Next, if the request was successful, the Android Market application sends an ACTION_NOTIFY broadcast intent. This message contains a notification ID, which you can use to retrieve the transaction details for the REQUEST_PURCHASE request.
Keep in mind, the Android Market application also sends an ACTION_NOTIFY for refunds. For more information, see Handling ACTION_NOTIFY messages.
You retrieve transaction information in response to an ACTION_NOTIFY broadcast intent. The ACTION_NOTIFY message contains a notification ID, which you can use to retrieve transaction information.
To retrieve transaction information for a purchase or refund you must specify five keys in the request Bundle. The following code sample shows how to set these keys and make the request. In the sample, mService is an instance of the MarketBillingService interface.
/**
* Request type is GET_PURCHASE_INFORMATION
*/
  Bundle request = makeRequestBundle("GET_PURCHASE_INFORMATION");
  request.putLong(REQUEST_NONCE, mNonce);
  request.putStringArray(NOTIFY_IDS, mNotifyIds);
  Bundle response = mService.sendBillingRequest(request);
  // Do something with this response.
}
The makeRequestBundle() method constructs an initial Bundle, which contains the three keys that are required for all requests: BILLING_REQUEST, API_VERSION, and PACKAGE_NAME. The additional keys are then added to the bundle prior to invoking the sendBillingRequest() method. The REQUEST_NONCE key contains a cryptographically secure nonce (number used once) that you must generate. The Android Market application returns this nonce with the ACTION_PURCHASE_STATE_CHANGED broadcast intent so you can verify the integrity of the transaction information. The NOTIFY_IDS key contains an array of notification IDs, which you received in the ACTION_NOTIFY broadcast intent.
The request returns a synchronous Bundle response, which contains two keys: RESPONSE_CODE and REQUEST_ID. The RESPONSE_CODE key provides you with the status of the request and the REQUEST_ID key provides you with a unique request identifier for the request.
A GET_PURCHASE_INFORMATION request also triggers two asynchronous responses (broadcast intents). First, the Android Market application sends an ACTION_RESPONSE_CODE broadcast intent, which provides status and error information about the request. Next, if the request was successful, the Android Market application sends an ACTION_PURCHASE_STATE_CHANGED broadcast intent. This message contains detailed transaction information. The transaction information is contained in a signed JSON string (unencrypted). The message includes the signature so you can verify the integrity of the signed string.
To acknowledge that you received transaction information you send a CONFIRM_NOTIFICATIONS request. You must specify four keys in the request Bundle. The following code sample shows how to set these keys and make the request. In the sample, mService is an instance of the MarketBillingService interface.
/**
* Request type is CONFIRM_NOTIFICATIONS
*/
  Bundle request = makeRequestBundle("CONFIRM_NOTIFICATIONS");
  request.putStringArray(NOTIFY_IDS, mNotifyIds);
  Bundle response = mService.sendBillingRequest(request);
  // Do something with this response.
}
The makeRequestBundle() method constructs an initial Bundle, which contains the three keys that are required for all requests: BILLING_REQUEST, API_VERSION, and PACKAGE_NAME. The additional NOTIFY_IDS key is then added to the bundle prior to invoking the sendBillingRequest() method. The NOTIFY_IDS key contains an array of notification IDs, which you received in an ACTION_NOTIFY broadcast intent and also used in a GET_PURCHASE_INFORMATION request.
The request returns a synchronous Bundle response, which contains two keys: RESPONSE_CODE and REQUEST_ID. The RESPONSE_CODE key provides you with the status of the request and the REQUEST_ID key provides you with a unique request identifier for the request.
A CONFIRM_NOTIFICATIONS request triggers a single asynchronous response—an ACTION_RESPONSE_CODE broadcast intent. This broadcast intent provides status and error information about the request.
To restore a user's transaction information, you send a RESTORE_TRANSACTIONS request. You must specify four keys in the request Bundle. The following code sample shows how to set these keys and make the request. In the sample, mService is an instance of the MarketBillingService interface.
/**
* Request type is RESTORE_TRANSACTIONS
*/
  Bundle request = makeRequestBundle("RESTORE_TRANSACTIONS");
  request.putLong(REQUEST_NONCE, mNonce);
  Bundle response = mService.sendBillingRequest(request);
  // Do something with this response.
}
The makeRequestBundle() method constructs an initial Bundle, which contains the three keys that are required for all requests: BILLING_REQUEST, API_VERSION, and PACKAGE_NAME. The additional REQUEST_NONCE key is then added to the bundle prior to invoking the sendBillingRequest() method. The REQUEST_NONCE key contains a cryptographically secure nonce (number used once) that you must generate. The Android Market application returns this nonce with the transactions information contained in the ACTION_PURCHASE_STATE_CHANGED broadcast intent so you can verify the integrity of the transaction information.
The request returns a synchronous Bundle response, which contains two keys: RESPONSE_CODE and REQUEST_ID. The RESPONSE_CODE key provides you with the status of the request and the REQUEST_ID key provides you with a unique request identifier for the request.
A RESTORE_TRANSACTIONS request also triggers two asynchronous responses (broadcast intents). First, the Android Market application sends an ACTION_RESPONSE_CODE broadcast intent, which provides status and error information about the request. Next, if the request was successful, the Android Market application sends an ACTION_PURCHASE_STATE_CHANGED broadcast intent. This message contains the detailed transaction information. The transaction information is contained in a signed JSON string (unencrypted). The message includes the signature so you can verify the integrity of the signed string.
You may also want your Service to receive intent messages from your BroadcastReceiver. You can use these intent messages to convey the information that was sent asynchronously from the Android Market application to your BroadcastReceiver. To see an example of how you can send and receive these intent messages, see the BillingReceiver.java and BillingService.java files in the sample application. You can use these samples as a basis for your own implementation. However, if you use any of the code from the sample application, be sure you follow the guidelines in Security and Design.
The Android Market application uses broadcast intents to send asynchronous billing responses to your application. To receive these intent messages, you need to create a BroadcastReceiver that can handle the following intents:
This broadcast intent contains an Android Market response code, and is sent after you make an in-app billing request. For more information about the response codes that are sent with this response, see Android Market Response Codes for In-app Billing.
This response indicates that a purchase has changed state, which means a purchase succeeded, was canceled, or was refunded. For more information about notification messages, see In-app Billing Broadcast Intents
This broadcast intent contains detailed information about one or more transactions. For more information about purchase state messages, see In-app Billing Broadcast Intents
Each of these broadcast intents provide intent extras, which your BroadcastReceiver must handle. The intent extras are listed in the following table (see table 1).
Table 1. Description of broadcast intent extras that are sent in response to billing requests.
| Intent | Extra | Description |
|---|---|---|
ACTION_RESPONSE_CODE |
INAPP_REQUEST_ID |
A long representing a request ID. A request ID identifies a specific billing request and is returned by Android Market at the time a request is made. |
ACTION_RESPONSE_CODE |
INAPP_RESPONSE_CODE |
An int representing the actual Android Market server response code. |
ACTION_NOTIFY |
NOTIFICATION_ID |
A String representing the notification ID for a given purchase state change. Android Market notifies you when there is a purchase state change and the notification includes a unique notification ID. To get the details of the purchase state change, you send the notification ID with the GET_PURCHASE_INFORMATION request. |
ACTION_PURCHASE_STATE_CHANGED |
INAPP_SIGNED_DATA |
A String representing the signed JSON string. The JSON string contains information about the billing transaction, such as order number, amount, and the item that was purchased or refunded. |
ACTION_PURCHASE_STATE_CHANGED |
INAPP_SIGNATURE |
A String representing the signature of the JSON string. |
The following code sample shows how to handle these broadcast intents and intent extras within a BroadcastReceiver. The BroadcastReceiver in this case is named BillingReceiver, just as it is in the sample application.
public class BillingReceiver extends BroadcastReceiver {

  private static final String TAG = "BillingReceiver";

  // Intent actions that we receive in the BillingReceiver from Android Market.
  // These are defined by Android Market and cannot be changed.
  // The sample application defines these in the Consts.java file.
  public static final String ACTION_NOTIFY = "com.android.vending.billing.IN_APP_NOTIFY";
  public static final String ACTION_RESPONSE_CODE = "com.android.vending.billing.RESPONSE_CODE";
  public static final String ACTION_PURCHASE_STATE_CHANGED =
    "com.android.vending.billing.PURCHASE_STATE_CHANGED";

  // The intent extras that are passed in an intent from Android Market.
  // These are defined by Android Market and cannot be changed.
  // The sample application defines these in the Consts.java file.
  public static final String NOTIFICATION_ID = "notification_id";
  public static final String INAPP_SIGNED_DATA = "inapp_signed_data";
  public static final String INAPP_SIGNATURE = "inapp_signature";
  public static final String INAPP_REQUEST_ID = "request_id";
  public static final String INAPP_RESPONSE_CODE = "response_code";


  @Override
  public void onReceive(Context context, Intent intent) {
    String action = intent.getAction();
    if (ACTION_PURCHASE_STATE_CHANGED.equals(action)) {
      String signedData = intent.getStringExtra(INAPP_SIGNED_DATA);
      String signature = intent.getStringExtra(INAPP_SIGNATURE);
      // Do something with the signedData and the signature.
    } else if (ACTION_NOTIFY.equals(action)) {
      String notifyId = intent.getStringExtra(NOTIFICATION_ID);
      // Do something with the notifyId.
    } else if (ACTION_RESPONSE_CODE.equals(action)) {
      long requestId = intent.getLongExtra(INAPP_REQUEST_ID, -1);
      int responseCodeIndex = intent.getIntExtra(INAPP_RESPONSE_CODE,
        ResponseCode.RESULT_ERROR.ordinal());
      // Do something with the requestId and the responseCodeIndex.
    } else {
      Log.w(TAG, "unexpected action: " + action);
    }
  }
  // Perform other processing here, such as forwarding intent messages to your local service.
}
In addition to receiving broadcast intents from the Android Market application, your BroadcastReceiver must handle the information it received in the broadcast intents. Usually, your BroadcastReceiver does this by sending the information to a local service (discussed in the next section). The BillingReceiver.java file in the sample application shows you how to do this. You can use this sample as a basis for your own BroadcastReceiver. However, if you use any of the code from the sample application, be sure you follow the guidelines that are discussed in Security and Design .
The in-app billing service uses two mechanisms to help verify the integrity of the transaction information you receive from Android Market: nonces and signatures. A nonce (number used once) is a cryptographically secure number that your application generates and sends with every GET_PURCHASE_INFORMATION and RESTORE_TRANSACTIONS request. The nonce is returned with the ACTION_PURCHASE_STATE_CHANGED broadcast intent, enabling you to verify that any given ACTION_PURCHASE_STATE_CHANGED response corresponds to an actual request that you made. Every ACTION_PURCHASE_STATE_CHANGED broadcast intent also includes a signed JSON string and a signature, which you can use to verify the integrity of the response.
Your application must provide a way to generate, manage, and verify nonces. The following sample code shows some simple methods you can use to do this.
  private static final SecureRandom RANDOM = new SecureRandom();
  private static HashSet<Long> sKnownNonces = new HashSet<Long>();

  public static long generateNonce() {
    long nonce = RANDOM.nextLong();
    sKnownNonces.add(nonce);
    return nonce;
  }

  public static void removeNonce(long nonce) {
    sKnownNonces.remove(nonce);
  }

  public static boolean isNonceKnown(long nonce) {
    return sKnownNonces.contains(nonce);
  }
Your application must also provide a way to verify the signatures that accompany every ACTION_PURCHASE_STATE_CHANGED broadcast intent. The Security.java file in the sample application shows you how to do this. If you use this file as a basis for your own security implementation, be sure to follow the guidelines in Security and Design and obfuscate your code.
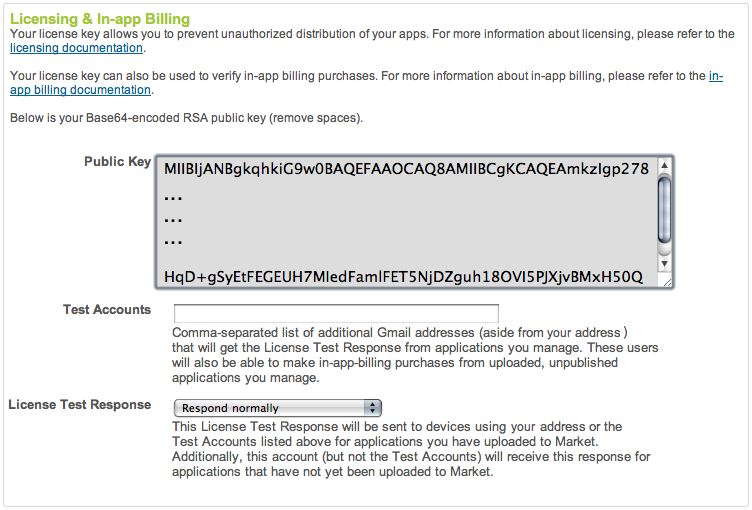
You will need to use your Android Market public key to perform the signature verification. The following procedure shows you how to retrieve Base64-encoded public key from the Android Market publisher site.
Important: To keep your public key safe from malicious users and hackers, do not embed your public key as an entire literal string. Instead, construct the string at runtime from pieces or use bit manipulation (for example, XOR with some other string) to hide the actual key. The key itself is not secret information, but you do not want to make it easy for a hacker or malicious user to replace the public key with another key.
After you finish adding in-app billing components to your project, you are ready to modify your application's code. For a typical implementation, like the one that is demonstrated in the sample application, this means you need to write code to do the following:
The sample code in Dungeons.java shows you how to do both of these tasks.
You must set up a database or some other mechanism for storing users' purchase information. The sample application provides an example database (PurchaseDatabase.java); however, the example database has been simplified for clarity and does not exhibit the security best practices that we recommend. If you have a remote server, we recommend that you store purchase information on your server instead of in a local database on a device. For more information about security best practices, see Security and Design.
Note: If you store any purchase information on a device, be sure to encrypt the data and use a device-specific encryption key.
You must provide users with a means for selecting items that they want to purchase. Android Market provides the checkout user interface (which is where the user provides a form of payment and approves the purchase), but your application must provide a control (widget) that invokes the sendBillingRequest() method when a user selects an item for purchase.
You can render the control and trigger the sendBillingRequest() method any way you want. The sample application uses a spinner widget and a button to present items to a user and trigger a billing request (see Dungeons.java). The user interface also shows a list of recently purchased items.