This documentation provides an early look at the Android Market In-app Billing service. The documentation may change without notice.
The Android Market publisher site provides several tools that help you test your in-app billing implementation before it is published. You can use these tools to create test accounts and purchase special reserved items that send static billing responses to your application.
To test in-app billing in an application you must install the application on an Android-powered device. You cannot use the Android emulator to test in-app billing. The device you use for testing must run a standard version of the Android 1.6 or later platform (API level 4 or higher), and have the most current version of the Android Market application installed. If a device is not running the most current Android Market application, your application won't be able to send in-app billing requests to Android Market. For general information about how to set up a device for use in developing Android applications, see Developing on a Device.
The following section shows you how to set up and use the in-app billing test tools.
Note: Debug log messages are turned off by default in the sample application. You can turn them on by setting the variable DEBUG to true in the Consts.java file.
We recommend that you first test your in-app billing implementation using static responses from Android Market. This enables you to verify that your application is handling the primary Android Market responses correctly and that your application is able to verify the signature correctly.
To test your implementation with static responses, you make an in-app billing request using a special item that has a reserved product ID. Each reserved product ID returns a specific static response from Android Market. No money is transferred when you make in-app billing requests with the reserved product IDs. Also, you cannot specify the form of payment when you make a billing request with a reserved product ID. Figure 1 shows the checkout flow for the reserved item that has the product ID android.test.purchased.
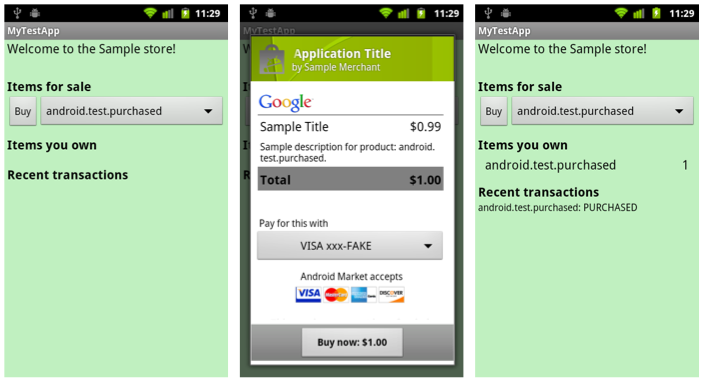
You do not need to list the reserved products in your application's product list. Android Market already knows about the reserved product IDs. Also, you do not need to upload your application to the publisher site to perform static response tests with the reserved product IDs. You can simply install your application on a device, log into the device, and make billing requests using the reserved product IDs.
There are four reserved product IDs for testing static in-app billing responses:
When you make an in-app billing request with this product ID, Android Market responds as though you successfully purchased an item. The response includes a JSON string, which contains fake purchase information (for example, a fake order ID). In some cases, the JSON string is signed and the response includes the signature so you can test your signature verification implementation using these responses.
When you make an in-app billing request with this product ID Android Market responds as though the purchase was canceled. This can occur when an error is encountered in the order process, such as an invalid credit card, or when you cancel a user's order before it is charged.
When you make an in-app billing request with this product ID, Android Market responds as though the purchase was refunded. Refunds cannot be initiated through the in-app billing feature. Refunds must be initiated by you (the merchant). A refund message is sent to your app by Android Market only when Android Market gets notification from Google Checkout that a refund has been made.
When you make an in-app billing request with this product ID Android Market responds as though the item being purchased was not listed in your app's product list.
In some cases, the reserved items may return signed static responses, which lets you test signature verification in your application. To test signature verification with the special reserved product IDs, you may need to set up trusted tester accounts or upload your application as a unpublished draft application. The following table (Table 1) shows you the conditions under which static responses are signed.
Table 1. Conditions under which static responses are signed.
| Application ever been published? | Draft application uploaded and unpublished? | User who is running the application | Static response signature |
|---|---|---|---|
| No | No | Any | Unsigned |
| No | No | Developer | Signed |
| Yes | No | Any | Unsigned |
| Yes | No | Developer | Signed |
| Yes | No | Trusted tester | Signed |
| Yes | Yes | Any | Signed |
To make an in-app billing request with a reserved product ID, you simply construct a normal REQUEST_PURCHASE request, but instead of using a real product ID from your application's product list you use one of the reserved product IDs.
Note: Making in-app billing requests with the reserved product IDs overrides the usual Android Market production system. When you send an in-app billing request for a reserved product ID, the quality of service will not be comparable to the production environment.
After you finish your static response testing, and you verify that signature verification is working in your application, you can test your in-app billing implementation by making actual in-app purchases. Testing real in-app purchases enables you to test the end-to-end in-app billing experience, including the actual responses from Android Market and the actual checkout flow that users will experience in your application.
Note: You do not need to publish your application to do end-to-end testing. You only need to upload your draft application to perform end-to-end testing.
To test your in-app billing implementation with actual in-app purchases, you will need to register at least one test account on the Android Market publisher site. You cannot use your developer account to test the complete in-app purchase process because Google Checkout does not let you buy items from yourself. If you have not set up test accounts before, see Setting up test accounts.
Also, a test account can purchase an item in your product list only if the item is published. The application does not need to be published, but the item does need to be published.
When you use a test account to purchase items, the account is billed through Google Checkout and your Google Checkout merchant account receives a payout for the purchase. Therefore, you need to refund purchases that are made with test accounts, otherwise the purchases will show up as actual payouts to your merchant account.
To test your in-app billing implementation with actual purchases, follow these steps:
See Creating a product list to learn how to do this.
See Developing on a Device for more information about how to do this.
We recommend that you make the test account the primary account on the device. To sign in to a device, do the following:
Note: The only way to change the primary account on a device is to do a factory reset, making sure you log on with your primary account first.
When you are finished testing your in-app billing implementation, you are ready to publish your application on Android Market. You can follow the normal steps for preparing, signing, and publishing your application.