To provide a widget for selecting a date, use the DatePicker
widget, which allows the user to select the month, day, and year, in a familiar interface.
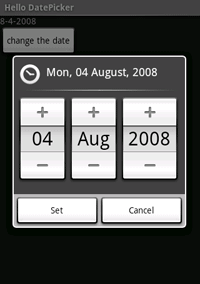
In this tutorial, you'll create a DatePickerDialog, which presents the
date picker in a floating dialog box at the press of a button. When the date is set by
the user, a TextView will update with the new date.
res/layout/main.xml file and insert the following:
<?xml version="1.0" encoding="utf-8"?>
<LinearLayout xmlns:android="http://schemas.android.com/apk/res/android"
    android:layout_width="wrap_content"
    android:layout_height="wrap_content"
    android:orientation="vertical">
    <TextView android:id="@+id/dateDisplay"
        android:layout_width="wrap_content"
        android:layout_height="wrap_content"
        android:text=""/>
    <Button android:id="@+id/pickDate"
        android:layout_width="wrap_content"
        android:layout_height="wrap_content"
        android:text="Change the date"/>
</LinearLayout>
This creates a basic LinearLayout with a TextView
that will display the date and a Button that will open the DatePickerDialog.
HelloDatePicker.java and add the following members to the class:
    private TextView mDateDisplay;
    private Button mPickDate;
    private int mYear;
    private int mMonth;
    private int mDay;

    static final int DATE_DIALOG_ID = 0;
The first group of members define variables for the layout Views and the
date items. The DATE_DIALOG_ID is a static integer that uniquely identifies the Dialog that will display the date picker.
onCreate()
method:
    protected void onCreate(Bundle savedInstanceState) {
        super.onCreate(savedInstanceState);
        setContentView(R.layout.main);

        // capture our View elements
        mDateDisplay = (TextView) findViewById(R.id.dateDisplay);
        mPickDate = (Button) findViewById(R.id.pickDate);

        // add a click listener to the button
        mPickDate.setOnClickListener(new View.OnClickListener() {
            public void onClick(View v) {
                showDialog(DATE_DIALOG_ID);
            }
        });

        // get the current date
        final Calendar c = Calendar.getInstance();
        mYear = c.get(Calendar.YEAR);
        mMonth = c.get(Calendar.MONTH);
        mDay = c.get(Calendar.DAY_OF_MONTH);

        // display the current date (this method is below)
        updateDisplay();
    }
First, the content is set to the main.xml layout. Then the TextView and Button elements are captured from the layout
with findViewById(int). A
new View.OnClickListener is created for the
Button, so that when it is clicked, it
will call showDialog(int), passing the unique integer ID for
the date picker dialog. Using showDialog(int) allows the Activity to manage the life-cycle of the dialog and will call the onCreateDialog(int) callback method to request the Dialog
that should be displayed (which you'll
define later). After the on-click listener is set, a new Calendar is created
and the current year, month and day are acquired. Finally, the private
updateDisplay() method is called in order to fill the TextView
with the current date.
updateDisplay() method:
    // updates the date in the TextView
    private void updateDisplay() {
        mDateDisplay.setText(
            new StringBuilder()
                    // Month is 0 based so add 1
                    .append(mMonth + 1).append("-")
                    .append(mDay).append("-")
                    .append(mYear).append(" "));
    }
This method uses the member date values declared for the class to write the date to the layout's
TextView, mDateDisplay, which was also declared and initialized
above.
DatePickerDialog.OnDateSetListener as a member of the
HelloDatePicker class:
    // the callback received when the user "sets" the date in the dialog
    private DatePickerDialog.OnDateSetListener mDateSetListener =
            new DatePickerDialog.OnDateSetListener() {

                public void onDateSet(DatePicker view, int year,
                                      int monthOfYear, int dayOfMonth) {
                    mYear = year;
                    mMonth = monthOfYear;
                    mDay = dayOfMonth;
                    updateDisplay();
                }
            };
The DatePickerDialog.OnDateSetListener listens for when the user
has set the date (by clicking the "Set" button). At that time, the onDateSet()
callback method is called, which is defined to update the mYear, mMonth, and
mDay member fields with the new date then call the private updateDisplay()
method to update the TextView.
onCreateDialog(int) callback method to the HelloDatePicker class:
@Override
protected Dialog onCreateDialog(int id) {
    switch (id) {
    case DATE_DIALOG_ID:
        return new DatePickerDialog(this,
                    mDateSetListener,
                    mYear, mMonth, mDay);
    }
    return null;
}
This is an Activity callback method that is passed the integer ID given to
showDialog(int) (which is called by the button's View.OnClickListener). When the ID matches the switch case defined here, a DatePickerDialog is instantiated with the DatePickerDialog.OnDateSetListener created in the previous
step, along with the date variables to initialize the widget date.
When you press the "Change the date" button, you should see the following: