Android Market offers a licensing service that lets you enforce licensing policies for paid applications that you publish through Android Market. With Android Market Licensing, your applications can query Android Market at run time to obtain their licensing status for the current user, then allow or disallow further use as appropriate.
Using the service, you can apply a flexible licensing policy on an application-by-application basis — each application can enforce licensing in the way most appropriate for it. If necessary, an application can apply custom constraints based on the licensing status obtained from Android Market. For example, an application can check the licensing status and then apply custom constraints that allow the user to run it unlicensed for a specific number of times, or for a specific validity period. An application can also restrict use of the application to a specific device, in addition to any other constraints.
The licensing service is a secure means of controlling access to your
applications. When an application checks the licensing status, the Market server
signs the licensing status response using a key pair that is uniquely associated
with the publisher account. Your application stores the public key in its
compiled .apk file and uses it to verify the licensing status
response.
Any application that you publish through Android Market can use the Android Market Licensing service. No special account or registration is needed. Additionally, because the service uses no dedicated framework APIs, you can add licensing to any legacy application that uses a minimum API level of 3 or higher.
To help you add licensing to your application, the Android SDK provides library sources that you can include in your application project. The License Verification Library (LVL) handles all of the licensing-related communication with the Android Market client and the licensing service. With the LVL integrated, your application can determine its licensing status for the current user by simply calling a library checker method and implementing a callback that receives the status.
This document explains how the licensing service works and how to add it to your application.
Android Market Licensing is a network-based service that lets an application on an Android-powered device query a trusted licensing server, to determine whether the application is licensed to the current device user. After receiving the server response, the application can then allow or disallow further use of the application as needed. In the service, the role of the licensing server is to provide the license status for the current user; the application itself is responsible for querying the server and conditionally granting access to the application.
The licensing service is based on the capability of the Android Market server to determine whether a given user is licensed to use a given application. The server considers a user licensed if the user is recorded to have purchased the application, or if the application is available for free. To properly identify the user and determine the license status, the server requires information about the application and user — the application and the Android Market client work together to assemble the information and pass it to the server.
In the licensing service, an application does not query the licensing server directly, but instead calls the Android Market client over remote IPC to initiate a license request. In the license request:
Notice that during a license check, the application does not manage any network connections or use any licensing related APIs in the Android platform.
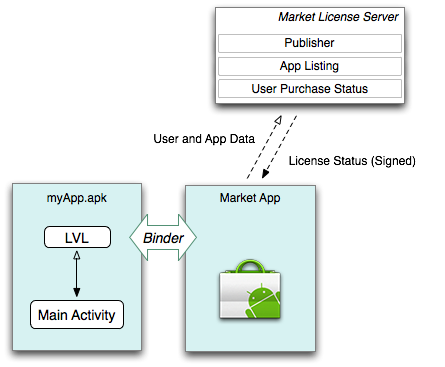
Figure 1. Your application initiates a license check through the LVL and the Android Market client, which handles communication with the Market server.
To ensure the integrity of each license query, the server signs the license response data using an RSA key pair that is shared exclusively between the server and the application publisher.
The licensing service generates a single licensing key pair for each
publisher account and exposes the public key in the account's profile page. The
publisher copies the public key and embeds it in the application source code,
then compiles and publishes the .apk. The server retains the
private key internally and uses it to sign license responses for applications
published on that account.
When the application receives a signed response, it uses the embedded public key to verify the data. The use of public key cryptography in the licensing service makes it possible for the application to detect responses that have been tampered with or that are spoofed.
To use licensing in your application, add code to the application to initiate a license check request and handle the response when it is received. You can choose when, and how often, you want your application to check its license and you have full control over how it handles the response, verifies the signed response data, and enforces access controls.
To simplify the process of adding support for licensing, download and integrate the Licensing Verification Library, described below. Integration is straightforward.
When you are finished integrating the LVL, use a test environment provided by the publisher site to test your application's handling of server responses.
Finally, publish the application .apk on Market using the
normal process. If you previously used the copy-protection provided by Android
Market, you can remove it from applications that use licensing.
The Android SDK includes a License Verification Library (LVL) that you can download and use as the basis for your application's licensing implementation. The LVL greatly simplifies the process of adding licensing to your application and helps ensure a more secure, robust implementation for your application. The LVL provides internal classes that handle most of the standard operations of a license query, such as contacting Android Market to initiate a license request and verifying and validating the responses. It also exposes key interfaces that let you easily plug in your custom code for defining licensing policy and managing access as needed by your application. The key LVL interfaces are:
To help you get started with a Policy, the LVL provides two fully complete Policy implementations that you can use without modification or adapt to your needs:
The LVL is available as a downloadable component of the Android SDK. The component includes both the LVL itself and an example application that shows how the library should be integrated with your application and how your application should manage response data, UI interaction, and error conditions.
The LVL sources are provided as an Android library project, which means that you can maintain a single set of library sources and share them across multiple applications. A full test environment is also available through the SDK, so you can develop and test the licensing implementation in your applications before publishing them, even if you don't have access to a physical device.
Android Market Licensing is designed to let you apply license controls to applications that you publish through Android Market. The service is not designed to let you control access to applications that are not published through Android Market or that are run on devices that do not offer the Android Market client.
Here are some points to keep in mind as you implement licensing in your application:
Android Market Licensing is a flexible, secure mechanism for controlling access to your applications. It effectively replaces the copy-protection mechanism offered on Android Market and gives you wider distribution potential for your applications.
Although no license mechanism can completely prevent all unauthorized use, the licensing service lets you control access for most types of normal usage, across all compatible devices, locked or unlocked, that run Android 1.5 or higher version of the platform.
The sections below describe how to add Android Market licensing to your applications.
Android Market licensing lets you manage access to applications that users have downloaded from Android Market. To use licensing in an application, you need to have a publisher account on Android Market so that you can publish the application to users.
If you don't already have a publisher account, you need to register for one using your Google account and agree to the terms of service. Once you are registered, you can upload applications at your convenience and begin debugging and testing your licensing implementation. For more information about publishing on Android Market, see Publishing Your Applications
To register as an Android Market developer and set up your publisher account, visit the Android Market publisher site:
http://market.android.com/publish
If you already have a publisher account on Android Market, use your existing account to set up licensing. You do not need to register for a new account to support licensing (and doing so is not recommended, especially if you are adding licensing support to applications that you have already published). In all cases, if you have published applications, you manage licensing for those applications through the account on which the applications are published.
Once your publisher account is set up, use the account to:
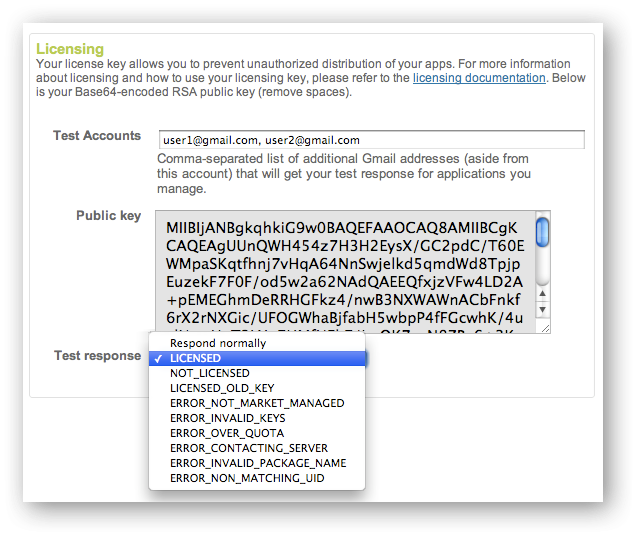
Once you are signed into your publisher account, you can manage several administrative controls for Android Market licensing. The controls are available in the Edit Profile page, in the "Licensing" panel, shown below. The controls let you:

For more information about how to work with test accounts and static test responses, see Setting Up a Testing Environment, below.
Once you've set up your publisher account on Android Market, the next step is to set up your development environment for licensing.
Setting up your environment for licensing involves these tasks:
The sections below describe these tasks. When you are done with setup, you can begin integrating the LVL into your applications.
To get started, you need to set up a proper runtime environment on which you can run, debug and test your application's implementation of license checking and enforcement.
To work with Android Market licensing, you need a functioning Android application to which you can add licensing support.
If you are new to Android and don't yet have a functioning application, the LVL component includes a sample application that you can set up as a new application project. The sample provides a complete, working example of how licensing works. For more information, see Downloading the LVL.
If you haven't done so, you need to download the Android SDK before you can develop Android applications. The SDK provides the tools that you need to build and debug Android applications, including applications that use Android Market licensing. For complete information, including installation instructions, see the Android SDK.
If you have already installed the SDK, make sure to update the SDK tools and ADT Plugin to the latest versions. You can update the SDK tools using the Android SDK and AVD Manager and ADT through Help > Software Updates... in Eclipse.
After you've installed the latest SDK and tools, set up your development environment as described below.
As described earlier, applications check licensing status not by contacting the licensing server directly, but by binding to a service provided by the Android Market application and initiating a license check request. The Android Market service then handles the direct communication with the licensing server and finally routes the response back to your application. To debug and test licensing in your application, you need to set up a runtime environment that includes the necessary Android Market service, so that your application is able to send license check requests to the licensing server.
There are two types of runtime environment that you can use:
The sections below provide more information.
You can use an Android-powered device as the runtime environment for debugging and testing licensing on your application.
The device you use must:
If Android Market is not preinstalled in the system image, your application won't be able to communicate with the Android Market licensing server.
For general information about how to set up a device for use in developing Android applications, see Developing on a Device.
You can also use an Android emulator as your runtime environment for debugging and testing licensing.
Because the standard Android platforms provided in the Android SDK do not include Android Market, you need to download the Google APIs Add-On platform, API Level 8 (or higher), from the SDK repository. After downloading the add-on, you need to create an AVD configuration that uses that system image.
The Google APIs Add-On does not include the full Android Market client. However, it does provide:
Several versions of the add-on are available in the SDK repository, but only Google APIs Add-On, API 8 (release 2) or higher version of the add-on includes the necessary Android Market services. This means that you cannot use Google APIs Add-On API 7 or lower as a runtime environment for developing licensing on an emulator.
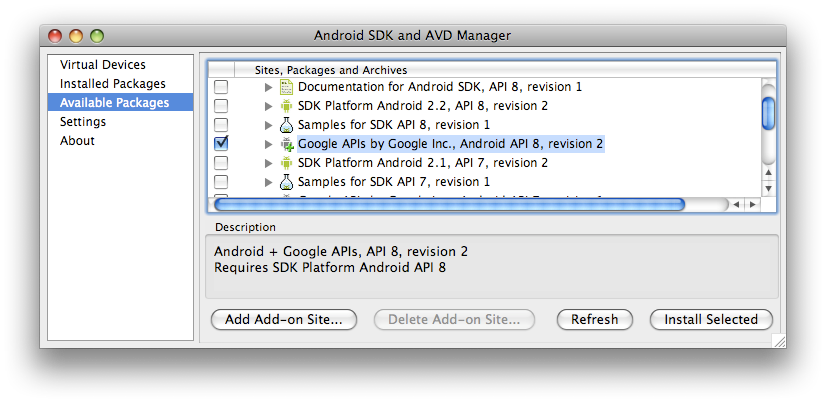
To set up an emulator for adding licensing to an application, follow these steps:
When the download is complete, use the Android SDK and AVD Manager to create a new AVD based on that component, described next.
If you are not familiar with AVDs or how to use them, see Android Virtual Devices.
After you set up a runtime environment that meets the requirements described
above — either on an actual device or on an emulator — make sure to
update your application project or build scripts as needed, so that your compiled
.apk files that use licensing are deployed into that environment.
In particular, if you are developing in Eclipse, make sure that you set up a
Run/Debug Configuration that targets the appropriate device or AVD.
You do not need to make any changes to your application's build configuration, provided that the project is already configured to compile against a standard Android 1.5 (API level 3) or higher library. For example:
In general, adding licensing to an application should have no impact whatsoever on the application's build configuration.
The License Verification Library (LVL) is a collection of helper classes that greatly simplify the work that you need to do to add licensing to your application. In all cases, we recommend that you download the LVL and use it as the basis for the licensing implementation in your application.
The LVL is available as a downloadable component of the Android SDK. The component includes:
To download the LVL component into your development environment, use the Android SDK and AVD Manager. Launch the Android SDK and AVD Manager and then select the "Market Licensing" component, as shown in the figure below. Accept the terms and click Install Selected to begin the download.
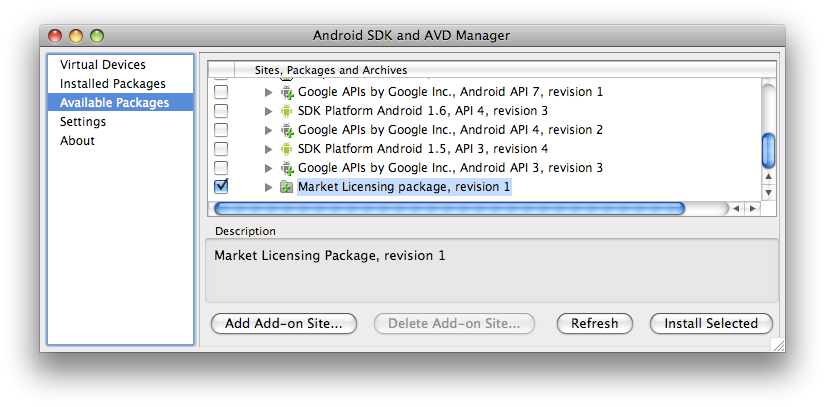
When the download is complete, the Android SDK and AVD Manager installs both the LVL library project and the example application into these directories:
<sdk>/market_licensing/library/
(the LVL library project)
<sdk>/market_licensing/sample/ (the example
application)
If you aren't familiar with how to download components into your SDK, see the Adding SDK Components document.
After downloading the LVL to your computer, you need to set it up in your development environment, either as an Android library project or by copying (or importing) the library sources directly into your existing application package. In general, using the LVL as a library project is recommended, since it lets you reuse your licensing code across multiple applications and maintain it more easily over time. Note that the LVL is not designed to be compiled separately and added to an application as a static .jar file.
Because you will be customizing the LVL sources to some extent, you should
make sure to move or copy the library sources (the entire
directory at <sdk>/market_licensing/library/)
to a working directory outside of the SDK. You should then use the relocated
sources as your working set. If you are using a source-code management
system, add and track the sources that are in the working location rather
than those in default location in the SDK.
Moving the library sources is important is because, when you later update the Market licensing package, the SDK installs the new files to the same location as the older files. Moving your working library files to a safe location ensures that your work won't be inadvertently overwritten should you download a new version of the LVL.
The LVL is provided as an Android library project, which means that you can share its code and resources across multiple applications.
If you aren't familiar with library projects or how to use them, read more in Developing in Eclipse with ADT or Developing in Other IDEs, as appropriate for your environment.
The recommended way of using the LVL is setting it up as a new Android
library project. A library project is a type of development project
that holds shared Android source code and resources. Other Android application
projects can reference the library project and, at build time, include its
compiled sources in their .apk files. In the context of licensing,
this means that you can do most of your licensing development once, in a library
project, then include the library sources in your various application projects.
In this way, you can easily maintain a uniform implementation of licensing
across all of your projects and maintain it centrally.
The LVL is provided as a configured library project — once you have downloaded it, you can start using it right away.
If you are working in Eclipse with ADT, you need to add the LVL to your workspace as a new development project, in the same way as you would a new application project.
library directory
(the directory containing the library's AndroidManifest.xml file) as the project
root. When created, the project is
predefined as a library project in its default.properties file, so
no further configuration is needed.
For more information about how to create an application project or work with library projects in Eclipse, see Developing in Eclipse with ADT.
As an alternative to adding the LVL as a library project, you can copy the
library sources directly into your application. To do so, copy (or import) the
LVL's library/src/com directory into your application's
src/ directory.
If you add the LVL sources directly to your application, you can skip the next section and start working with the library, as described in .
If you want to use the LVL sources as a library project, you need to add a reference to the LVL library project in your application project properties. This tells build tools to include the LVL library project sources in your application at compile time. The process for adding a reference to a library project depends on your development environment, as described below.
If you are developing in Eclipse with ADT, you should already have added the library project to your workspace, as described in the previous section. If you haven't done that already, do it now before continuing.
Next, open the application's project properties window, as shown below. Select the "Android" properties group and click Add, then choose the LVL library project (com_android_vending_licensing) and click OK. For more information, see Developing in Eclipse with ADT

If you are developing using the SDK command-line tools, navigate to the
directory containing your application project and open the
default.properties file. Add a line to the file that specifies the
android.library.reference.<n> key and the path to the
library. For example:
android.library.reference.1=path/to/library_project
Alternatively, you can use this command to update the project properties, including the reference to the library project:
android update lib-project
--target <target_ID> \
--path path/to/my/app_project \
--library path/to/my/library_project
For more information about working with library projects, see Developing in Eclipse with ADT or Developing in Other IDEs, as appropriate for your environment.
Once you've followed the steps above to set up a publisher account and development environment, you are ready to begin integrating the LVL with your application.
Integrating the LVL with your application code involves these tasks:
The sections below describe these tasks. When you are done with the integration, you should be able to compile your application successfully and you can begin testing, as described in Setting Up the Test Environment.
For an overview of the full set of source files included in the LVL, see Summary of LVL Classes and Interfaces.
To use the Android Market application for sending a license check to the
server, your application must request the proper permission,
com.android.vending.CHECK_LICENSE. If your application does
not declare the licensing permission but attempts to initiate a license check,
the LVL throws a security exception.
To request the licensing permission in your application, declare a <uses-permission>
element as a child of <manifest>, as follows:
<uses-permission
android:name="com.android.vending.CHECK_LICENSE">
For example, here's how the LVL sample application declares the permission:
<?xml version="1.0" encoding="utf-8"?>

<manifest xmlns:android="http://schemas.android.com/apk/res/android" ...">
    <!-- Devices >= 3 have version of Android Market that supports licensing. -->
    <uses-sdk android:minSdkVersion="3" />
    <!-- Required permission to check licensing. -->
    <uses-permission android:name="com.android.vending.CHECK_LICENSE" />
    ...
</manifest>
Note: Currently, you cannot declare the
CHECK_LICENSE permission in the LVL library project's manifest,
because the SDK Tools will not merge it into the manifests of dependent
applications. Instead, you must declare the permission in each dependent
application's manifest.
The LVL includes a complete Policy implementation called ServerManagedPolicy that makes use of license-management settings provided by the Android Market server.
Use of ServerManagedPolicy as the basis for your Policy is strongly recommended. For more information, see ServerManagedPolicy section, below.
Android Market licensing service does not itself determine whether a given user with a given license should be granted access to your application. Rather, that responsibility is left to a Policy implementation that you provide in your application.
Policy is an interface declared by the LVL that is designed to hold your application's logic for allowing or disallowing user access, based on the result of a license check. To use the LVL, your application must provide an implementation of Policy.
The Policy interface declares two methods, allowAccess() and
processServerResponse(), which are called by a LicenseChecker
instance when processing a response from the license server. It also declares an
enum called LicenseResponse, which specifies the license response
value passed in calls to processServerResponse().
processServerResponse() lets you preprocess the raw response
data received from the licensing server, prior to determining whether to grant
access.
A typical implementation would extract some or all fields from the license
response and store the data locally to a persistent store, such as through
SharedPreferences storage, to ensure that the data is
accessible across application invocations and device power cycles. For example,
a Policy would maintain the timestamp of last successful license check, the
retry count, the license validity period, and similar information in a
persistent store, rather than resetting the values each time the application is
launched.
When storing response data locally, the Policy must ensure that the data is obfuscated (see Implementing an Obfuscator, below).
allowAccess() determines whether to grant the user access to
your application, based on any available license response data (from the
licensing server or from cache) or other application-specific information. For
example, your implementation of allowAccess() could take into
account additional criteria, such as usage or other data retrieved from a
backend server. In all cases, an implementation of allowAccess()
should only return true if the user is licensed to use the
application, as determined by the licensing server, or if there is a transient
network or system problem that prevents the license check from completing. In
such cases, your implementation can maintain a count of retry responses and
provisionally allow access until the next license check is complete.To simplify the process of adding licensing to your application and to provide an illustration of how a Policy should be designed, the LVL includes two full Policy implementations that you can use without modification or adapt to your needs:
For most applications, the use of ServerManagedPolicy is highly recommended. ServerManagedPolicy is the LVL default and is integrated with the LVL sample application.
In your licensing implementation, you can use one of the complete policies provided in the LVL (ServerManagedPolicy or StrictPolicy) or you can create a custom policy. For any type of custom policy, there are several important design points to understand and account for in your implementation.
The licensing server applies general request limits to guard against overuse of resources that could result in denial of service. When an application exceeds the request limit, the licensing server returns a 503 response, which gets passed through to your application as a general server error. This means that no license response will be available to the user until the limit is reset, which can affect the user for an indefinite period.
If you are designing a custom policy, we recommend that the Policy:
VT
extra is highly recommended. See Server Response Extras
for more information.Designing your Policy according to the guidelines listed above is critical, because it ensures the best possible experience for users while giving you effective control over your application even in error conditions.
Note that any Policy can use settings provided by the licensing server to help manage validity and caching, retry grace period, and more. Extracting the server-provided settings is straightforward and making use of them is highly recommended. See the ServerManagedPolicy implementation for an example of how to extract and use the extras. For a list of server settings and information about how to use them, see Server Response Extras in the Appendix of this document.
For certain types of licensing responses, the licensing server appends extra settings to the responses, to help the application manage licensing effectively.
See Server Response Extras for
a list of settings and ServerManagedPolicy.java for information
about how a Policy can use the extras.
The LVL includes a full and recommended implementation of the Policy interface called ServerManagedPolicy. The implementation is integrated with the LVL classes and serves as the default Policy in the library.
ServerManagedPolicy provides all of the handling for license and retry
responses. It caches all of the response data locally in a
SharedPreferences file, obfuscating it with the
application's Obfuscator implementation. This ensures that the license response
data is secure and persists across device power cycles. ServerManagedPolicy
provides concrete implementations of the interface methods
processServerResponse() and allowAccess() and also
includes a set of supporting methods and types for managing license
responses.
Importantly, a key feature of ServerMangedPolicy is its use of
server-provided settings as the basis for managing licensing across an
application's refund period and through varying network and error conditions.
When an application contacts the Android Market server for a license check, the
server appends several settings as key-value pairs in the extras field of certain
license response types. For example, the server provides recommended values for the
application's license validity period, retry grace period, and maximum allowable
retry count, among others. ServerManagedPolicy extracts the values from the
license response in its processServerResponse() method and checks
them in its allowAccess() method. For a list of the server-provided
settings used by ServerManagedPolicy, see Server Response
Extras in the Appendix of this document.
For convenience, best performance, and the benefit of using license settings from the Android Market server, using ServerManagedPolicy as your licensing Policy is strongly recommended.
If you are concerned about the security of license response data that is stored locally in SharedPreferences, you can use a stronger obfuscation algorithm or design a stricter Policy that does not store license data. The LVL includes an example of such a Policy — see StrictPolicy for more information.
To use ServerManagedPolicy, simply import it to your Activity, create an instance, and pass a reference to the instance when constructing your LicenseChecker. See Instantiate LicenseChecker and LicenseCheckerCallback for more information.
The LVL includes an alternative full implementation of the Policy interface called StrictPolicy. The StrictPolicy implementation provides a more restrictive Policy than ServerManagedPolicy, in that it does not allow the user to access the application unless a license response is received from the server at the time of access that indicates that the user is licensed.
The principal feature of StrictPolicy is that it does not store any license response data locally, in a persistent store. Because no data is stored, retry requests are not tracked and cached responses can not be used to fulfill license checks. The Policy allows access only if:
Using StrictPolicy is appropriate if your primary concern is to ensure that, in all possible cases, no user will be allowed to access the application unless the user is confirmed to be licensed at the time of use. Additionally, the Policy offers slightly more security than ServerManagedPolicy — since there is no data cached locally, there is no way a malicious user could tamper with the cached data and obtain access to the application.
At the same time, this Policy presents a challenge for normal users, since it means that they won't be able to access the application when there is no network (cell or wi-fi) connection available. Another side-effect is that your application will send more license check requests to the server, since using a cached response is not possible.
Overall, this policy represents a tradeoff of some degree of user convenience for absolute security and control over access. Consider the tradeoff carefully before using this Policy.
To use StrictPolicy, simply import it to your Activity, create an instance, and pass a reference to it when constructing your LicenseChecker. See Instantiate LicenseChecker and LicenseCheckerCallback for more information.
The LVL includes a full Obfuscator implementation in the
AESObfuscator.java file. The Obfuscator uses AES encryption to
obfuscate/unobfuscate data. If you are using a Policy (such as
ServerManagedPolicy) that caches license response data, using AESObfuscator as
basis for your Obfuscator implementation is highly recommended.
A typical Policy implementation needs to save the license response data for
an application to a persistent store, so that it is accessible across
application invocations and device power cycles. For example, a Policy would
maintain the timestamp of the last successful license check, the retry count,
the license validity period, and similar information in a persistent store,
rather than resetting the values each time the application is launched. The
default Policy included in the LVL, ServerManagedPolicy, stores license response
data in a SharedPreferences instance, to ensure that the
data is persistent.
Because the Policy will use stored license response data to determine whether to allow or disallow access to the application, it must ensure that any stored data is secure and cannot be reused or manipulated by a root user on a device. Specifically, the Policy must always obfuscate the data before storing it, using a key that is unique for the application and device. Obfuscating using a key that is both application-specific and device-specific is critical, because it prevents the obfuscated data from being shared among applications and devices.
The LVL assists the application with storing its license response data in a secure, persistent manner. First, it provides an Obfuscator interface that lets your application supply the obfuscation algorithm of its choice for stored data. Building on that, the LVL provides the helper class PreferenceObfuscator, which handles most of the work of calling the application's Obfuscator class and reading and writing the obfuscated data in a SharedPreferences instance.
The LVL provides a full Obfuscator implementation called AESObfuscator that uses AES encryption to obfuscate data. You can use AESObfuscator in your application without modification or you can adapt it to your needs. For more information, see the next section.
The LVL includes a full and recommended implementation of the Obfuscator interface called AESObfuscator. The implementation is integrated with the LVL sample application and serves as the default Obfuscator in the library.
AESObfuscator provides secure obfuscation of data by using AES to encrypt and decrypt the data as it is written to or read from storage. The Obfuscator seeds the encryption using three data fields provided by the application:
To use AESObfuscator, first import it to your Activity. Declare a private static final array to hold the salt bytes and initialize it to 20 randomly generated bytes.
    ...
    // Generate 20 random bytes, and put them here.
    private static final byte[] SALT = new byte[] {
     -46, 65, 30, -128, -103, -57, 74, -64, 51, 88, -95,
     -45, 77, -117, -36, -113, -11, 32, -64, 89
     };
    ...
Next, declare a variable to hold a device identifier and generate a value for
it in any way needed. For example, the sample application included in the LVL
queries the system settings for the
android.Settings.Secure.ANDROID_ID, which is unique to each device.
Note that, depending on the APIs you use, your application might need to
request additional permissions in order to acquire device-specific information.
For example, to query the TelephonyManager to obtain
the device IMEI or related data, the application will also need to request the
android.permission.READ_PHONE_STATE permission in its manifest.
Before requesting new permissions for the sole purpose of acquiring
device-specific information for use in your Obfuscator, consider
how doing so might affect your application or its filtering on Android Market
(since some permissions can cause the SDK build tools to add
the associated <uses-feature>).
Finally, construct an instance of AESObfuscator, passing the salt, application identifier, and device identifier. You can construct the instance directly, while constructing your Policy and LicenseChecker. For example:
    ...
    // Construct the LicenseChecker with a Policy.
    mChecker = new LicenseChecker(
        this, new ServerManagedPolicy(this,
            new AESObfuscator(SALT, getPackageName(), deviceId)),
        BASE64_PUBLIC_KEY  // Your public licensing key.
        );
    ...
For a complete example, see MainActivity in the LVL sample application.
Once you've implemented a Policy for managing access to your application, the
next step is to add a license check to your application, which initiates a query
to the licensing server if needed and manages access to the application based on
the license response. All of the work of adding the license check and handling
the response takes place in your main Activity source file.
To add the license check and handle the response, you must:
The sections below describe these tasks.
The sample application included with the LVL provides a full example of how
to initiate a license check and handle the result, in the
MainActivity.java file.
In most cases, you should add the license check to your application's main
Activity, in the onCreate() method. This
ensures that when the user launches your application directly, the license check
will be invoked immediately. In some cases, you can add license checks in other
locations as well. For example, if your application includes multiple Activity
components that other applications can start by Intent,
you could add license checks in those Activities.
A license check consists of two main actions:
checkAccess() method of a LicenseChecker object that
you construct.LicenseCheckerCallback interface that you implement. The
interface declares two methods, allow() and
dontAllow(), which are invoked by the library based on to the
result of the license check. You implement those two methods with whatever logic
you need, to allow or disallow the user access to your application. Note that
these methods do not determine whether to allow access — that
determination is the responsibility of your Policy implementation. Rather, these
methods simply provide the application behaviors for how to allow and
disallow access (and handle application errors).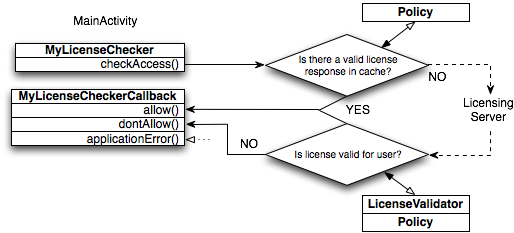
The diagram above illustrates how a typical license check takes place:
Context, a Policy implementation to use, and the
publisher account's public key for licensing as parameters. checkAccess() method on the
LicenseChecker object. The method implementation calls the Policy to determine
whether there is a valid license response cached locally, in
SharedPreferences.
checkAccess() implementation calls
allow().allow() method on the LicenseCheckerCallback object. dontAllow() method on LicenseCheckerCallback. processServerResponse() method. applicationError()
method. Note that, in addition to initiating the license check and handling the result, which are described in the sections below, your application also needs to provide a Policy implementation and, if the Policy stores response data (such as ServerManagedPolicy), an Obfuscator implementation.
First, open the class file of the application's main Activity and import LicenseChecker and LicenseCheckerCallback from the LVL package.
    import com.android.vending.licensing.LicenseChecker;
    import com.android.vending.licensing.LicenseCheckerCallback;
If you are using the default Policy implementation provided with the LVL, ServerManagedPolicy, import it also, together with the AESObfuscator. If you are using a custom Policy or Obfuscator, import those instead.
    import com.android.vending.licensing.ServerManagedPolicy;
    import com.android.vending.licensing.AESObfuscator;
LicenseCheckerCallback is an interface provided by the LVL for handling result of a license check. To support licensing using the LVL, you must implement LicenseCheckerCallback and its methods to allow or disallow access to the application.
The result of a license check is always a call to one of the LicenseCheckerCallback methods, made based on the validation of the response payload, the server response code itself, and any additional processing provided by your Policy. Your application can implement the methods in any way needed. In general, it's best to keep the methods simple, limiting them to managing UI state and application access. If you want to add further processing of license responses, such as by contacting a backend server or applying custom constraints, you should consider incorporating that code into your Policy, rather than putting it in the LicenseCheckerCallback methods.
In most cases, you should declare your implementation of LicenseCheckerCallback as a private class inside your application's main Activity class.
Implement the allow() and dontAllow() methods as
needed. To start with, you can use simple result-handling behaviors in the
methods, such as displaying the license result in a dialog. This helps you get
your application running sooner and can assist with debugging. Later, after you
have determined the exact behaviors you want, you can add more complex handling.
Some suggestions for handling unlicensed responses in
dontAllow() include:
The example below shows how the LVL sample application implements LicenseCheckerCallback, with methods that display the license check result in a dialog.
    private class MyLicenseCheckerCallback implements LicenseCheckerCallback {
        public void allow() {
            if (isFinishing()) {
                // Don't update UI if Activity is finishing.
                return;
            }
            // Should allow user access.
            displayResult(getString(R.string.allow));
        }

        public void dontAllow() {
            if (isFinishing()) {
                // Don't update UI if Activity is finishing.
                return;
            }
            displayResult(getString(R.string.dont_allow));
            // Should not allow access. An app can handle as needed,
            // typically by informing the user that the app is not licensed
            // and then shutting down the app or limiting the user to a
            // restricted set of features.
            // In this example, we show a dialog that takes the user to Market.
            showDialog(0);
        }
    }
Additionally, you should implement the applicationError()
method, which the LVL calls to let your application handle errors that are not
retryable. For a list of such errors, see Server Response Codes in the Appendix of this
document. You can implement the method in any way needed. In most cases, the
method should log the error code and call dontAllow().
During a license check, the LVL passes the request to the Android Market
application, which handles communication with the licensing server. The LVL
passes the request over asynchronous IPC (using Binder) so
the actual processing and network communication do not take place on a thread
managed by your application. Similarly, when the Android Market application
receives the result, it invokes a callback method over IPC, which in turn
executes in an IPC thread pool in your application's process.
The LicenseChecker class manages your application's IPC communication with the Android Market application, including the call that sends the request and the callback that receives the response. LicenseChecker also tracks open license requests and manages their timeouts.
So that it can handle timeouts properly and also process incoming responses without affecting your application's UI thread, LicenseChecker spawns a background thread at instantiation. In the thread it does all processing of license check results, whether the result is a response received from the server or a timeout error. At the conclusion of processing, the LVL calls your LicenseCheckerCallback methods from the background thread.
To your application, this means that:
If you want your LicenseCheckerCallback methods to update the UI thread,
instantiate a Handler in the main Activity's
onCreate() method,
as shown below. In this example, the LVL sample application's
LicenseCheckerCallback methods (see above) call displayResult() to
update the UI thread through the Handler's
post() method.
private Handler mHandler;

    @Override
    public void onCreate(Bundle savedInstanceState) {
        ...
        mHandler = new Handler();
    }
Then, in your LicenseCheckerCallback methods, you can use Handler methods to post Runnable or Message objects to the Handler. Here's how the sample application included in the LVL posts a Runnable to a Handler in the UI thread to display the license status.
    private void displayResult(final String result) {
        mHandler.post(new Runnable() {
            public void run() {
                mStatusText.setText(result);
                setProgressBarIndeterminateVisibility(false);
                mCheckLicenseButton.setEnabled(true);
            }
        });
    }
In the main Activity's
onCreate() method,
create private instances of LicenseCheckerCallback and LicenseChecker. You must
instantiate LicenseCheckerCallback first, because you need to pass a reference
to that instance when you call the contructor for LicenseChecker.
When you instantiate LicenseChecker, you need to pass in these parameters:
ContextIf you are using ServerManagedPolicy, you won't need to access the class directly, so you can instantiate it in the LicenseChecker constructor, as shown in the example below. Note that you need to pass a reference to a new Obfuscator instance when you construct ServerManagedPolicy.
The example below shows the instantiation of LicenseChecker and
LicenseCheckerCallback from the onCreate() method of an Activity
class.
public class MainActivity extends Activity {
    ...
    private LicenseCheckerCallback mLicenseCheckerCallback;
    private LicenseChecker mChecker;

    @Override
    public void onCreate(Bundle savedInstanceState) {
        super.onCreate(savedInstanceState);
        ...
        // Construct the LicenseCheckerCallback. The library calls this when done.
        mLicenseCheckerCallback = new MyLicenseCheckerCallback();

        // Construct the LicenseChecker with a Policy.
        mChecker = new LicenseChecker(
            this, new ServerManagedPolicy(this,
                new AESObfuscator(SALT, getPackageName(), deviceId)),
            BASE64_PUBLIC_KEY  // Your public licensing key.
            );
        ...
    }
}
Note that LicenseChecker calls the LicenseCheckerCallback methods from the UI thread only if there is valid license response cached locally. If the license check is sent to the server, the callbacks always originate from the background thread, even for network errors.
In your main Activity, add a call to the checkAccess() method of the
LicenseChecker instance. In the call, pass a reference to your
LicenseCheckerCallback instance as a parameter. If you need to handle any
special UI effects or state management before the call, you might find it useful
to call checkAccess() from a wrapper method. For example, the LVL
sample application calls checkAccess() from a
doCheck() wrapper method:
    @Override
    public void onCreate(Bundle savedInstanceState) {
        super.onCreate(savedInstanceState);
        ...
        // Call a wrapper method that initiates the license check
        doCheck();
        ...
    }
    ...
    private void doCheck() {
        mCheckLicenseButton.setEnabled(false);
        setProgressBarIndeterminateVisibility(true);
        mStatusText.setText(R.string.checking_license);
        mChecker.checkAccess(mLicenseCheckerCallback);
    }
For each publisher account, the Android Market service automatically generates a 2048-bit RSA public/private key pair that is used exclusively for licensing. The key pair is uniquely associated with the publisher account and is shared across all applications that are published through the account. Although associated with a publisher account, the key pair is not the same as the key that you use to sign your applications (or derived from it).
The Android Market publisher site exposes the public key for licensing to any developer signed in to the publisher account, but it keeps the private key hidden from all users in a secure location. When an application requests a license check for an application published in your account, the licensing server signs the license response using the private key of your account's key pair. When the LVL receives the response, it uses the public key provided by the application to verify the signature of the license response.
To add licensing to an application, you must obtain your publisher account's public key for licensing and copy it into your application. Here's how to find your account's public key for licensing:
To add the public key to your application, simply copy/paste the key string
from the text box into your application as the value of the String variable
BASE64_PUBLIC_KEY. When you are copying, make sure that you have
selected the entire key string, without omitting any characters.
Here's an example from the LVL sample application:
    public class MainActivity extends Activity {
        private static final String BASE64_PUBLIC_KEY = "MIIBIjANBgkqhkiG ... "; //truncated for this example
    ...
    }
Finally, to let the LVL clean up before your application
Context changes, add a call to the LicenseChecker's
onDestroy() method from your Activity's
onDestroy() implementation. The call causes the
LicenseChecker to properly close any open IPC connection to the Android Market
application's ILicensingService and removes any local references to the service
and handler.
Failing to call the LicenseChecker's onDestroy() method
can lead to problems over the lifecycle of your application. For example, if the
user changes screen orientation while a license check is active, the application
Context is destroyed. If your application does not
properly close the LicenseChecker's IPC connection, your application will crash
when the response is received. Similarly, if the user exits your application
while a license check is in progress, your application will crash when the
response is received, unless it has properly called the
LicenseChecker's onDestroy() method to disconnect from the service.
Here's an example from the sample application included in the LVL, where
mChecker is the LicenseChecker instance:
    @Override
    protected void onDestroy() {
        super.onDestroy();
        mChecker.onDestroy();
        ...
    }
If you are extending or modifying LicenseChecker, you might also need to call
the LicenseChecker's finishCheck() method, to clean up any open IPC
connections.
In some cases, you might want your Policy to limit the number of actual devices that are permitted to use a single license. This would prevent a user from moving a licensed application onto a number of devices and using the application on those devices under the same account ID. It would also prevent a user from "sharing" the application by providing the account information associated with the license to other individuals, who could then sign in to that account on their devices and access the license to the application.
The LVL supports per-device licensing by providing a
DeviceLimiter interface, which declares a single method,
allowDeviceAccess(). When a LicenseValidator is handling a response
from the licensing server, it calls allowDeviceAccess(), passing a
user ID string extracted from the response.
If you do not want to support device limitation, no work is
required — the LicenseChecker class automatically uses a default
implementation called NullDeviceLimiter. As the name suggests, NullDeviceLimiter
is a "no-op" class whose allowDeviceAccess() method simply returns
a LICENSED response for all users and devices.
Caution: Per-device licensing is not recommended for most applications because:
The Android Market publisher site provides configuration tools that let you and others test licensing on your application before it is published. As you are implementing licensing, you can make use of the publisher site tools to test your application's Policy and handling of different licensing responses and error conditions.
The main components of the test environment for licensing include:
Setting up the test environment properly involves:
The sections below provide more information.
Android Market provides a configuration setting in your publisher account that lets you override the normal processing of a license check and return a specified static response code. The setting is for testing only and applies only to license checks for applications that you have uploaded, made by any user signed in to an emulator or device using the credentials of the publisher account or a registered test account. For other users, the server always processes license checks according to normal rules.
To set a test response for your account, sign in to your publisher account and click "Edit Profile". In the Edit Profile page, locate the Test Response menu in the Licensing panel, shown below. You can select from the full set of valid server response codes to control the response or condition you want to test in your application.
In general, you should make sure to test your application's licensing implementation with every response code available in the Test Response menu. For a description of the codes, see Server Response Codes in the Appendix of this document.
Note that the test response that you configure applies account-wide — that is, it applies not to a single application, but to all applications associated with the publisher account. If you are testing multiple applications at once, changing the test response will affect all of those applications on their next license check (if the user is signed into the emulator or device using the publisher account or a test account).
Before you can successfully receive a test response for a license check, you must sign in to the device or emulator on which the application is installed, and from which it is querying the server. Specifically, you must sign using either your publisher account or one of the test accounts that you have set up. For more information about test accounts, see the next section.
See Server Response Codes for a list of test responses available and their meanings.
In some cases, you might want to let multiple teams of developers test licensing on applications that will ultimately be published through your publisher account, but without giving them access to your publisher account's sign-in credentials. To meet that need, the Android Market publisher site lets you set up one or more optional test accounts — accounts that are authorized to query the licensing server and receive static test responses from your publisher account.
Test accounts are standard Google accounts that you register on your publisher account, such that they will receive the test response for applications that you have uploaded. Developers can then sign in to their devices or emulators using the test account credentials and initiate license checks from installed applications. When the licensing server receives a license check from a user of a test account, it returns the static test response configured for the publisher account.
Necessarily, there are limitations on the access and permissions given to users signed in through test accounts, including:
The table below summarizes the differences in capabilities, between the publisher account, a test account, and any other account.
Table 1. Differences in account types for testing licensing.
| Account Type | Can check license before upload? | Can receive test response? | Can set test response? |
|---|---|---|---|
| Publisher account | Yes | Yes | Yes |
| Test account | No | Yes | No |
| Other | No | No | No |
To get started, you need to register each test account in your publisher account. As shown in Figure 7, above, you register test accounts in the Licensing panel of your publisher account's Edit Profile page. Simply enter the accounts as a comma-delimited list and click Save to save your profile changes.
You can use any Google account as a test account. If you want to own and control the test accounts, you can create the accounts yourself and distribute the credentials to your developers or testers.
As mentioned above, users of test accounts can only receive static test responses for applications that are uploaded to the publisher account. Since those users do not have permission to upload applications, as the publisher you will need to work with those users to collect apps for upload and distribute uploaded apps for testing. You can handle collection and distribution in any way that is convenient.
Once an application is uploaded and becomes known to the licensing server,
developers and testers can continue modify the application in their local
development environment, without having to upload new versions. You only need to
upload a new version if the local application increments the
versionCode attribute in the manifest file.
The licensing server handles static test responses in the normal way, including signing the license response data, adding extras parameters, and so on. To support developers who are implementing licensing using test accounts, rather than the publisher account, you will need to distribute your public key to them. Developers without access to the publisher site do not have access to your public key, and without the key they won't be able to verify license responses.
Note that if you decide to generate a new licensing key pair for your account for some reason, you need to notify all users of test accounts. For testers, you can embed the new key in the application package and distribute it to users. For developers, you will need to distribute the new key to them directly.
The licensing service is designed to determine whether a given user is licensed to use a given application — during a license check, the Android Market application gathers the user ID from the primary account on the system and sends it to the server, together with the package name of the application and other information. However, if there is no user information available, the license check cannot succeed, so the Android Market application terminates the request and returns an error to the application.
During testing, to ensure that your application can successfully query the licensing server, you must make sure that you sign in to an account on the device or emulator using:
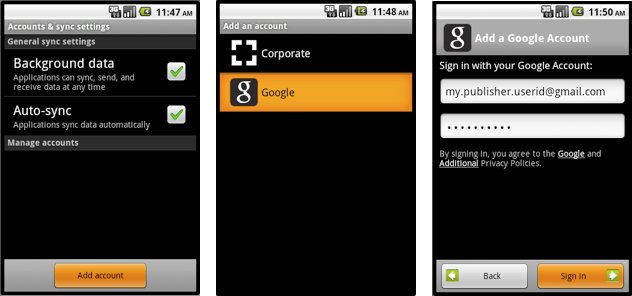
If you are testing licensing on an emulator, you need to sign in to a Google account on the emulator. If you do not see an option to create a new Google account, the problem might be that your AVD is running a standard Android system image, rather than the Google APIs Add-On, API 8 (release 2) or higher.
For more information, see Setting up the runtime environment, above.
Signing in using a publisher account offers the advantage of letting your applications receive static test responses even before the applications are uploaded to the publisher site.
If you are part of a larger organization or are working with external groups on applications that will be published through your site, you will more likely want to distribute test accounts instead, then use those to sign in during testing.
To sign in on a device or emulator, follow the steps below. The preferred approach is to sign in as the primary account — however, if there are other accounts already in use on the device or emulator, you can create an additional account and sign in to it using the publisher or test account credentials.
Once you are signed in, you can begin testing licensing in your application (if you have completed the LVL integration steps above). When your application initiates a license check, it will receive a response containing the static test response configured on the publisher account.
Note that, if you are using an emulator, you will need to sign in to the publisher account or test account each time you wipe data when restarting the emulator.
To ensure the security of your application, particularly for a paid application that uses licensing and/or custom constraints and protections, it's very important to obfuscate your application code. Properly obfuscating your code makes it more difficult for a malicious user to decompile the application's bytecode, modify it — such as by removing the license check — and then recompile it.
Several obfuscator programs are available for Android applications, including ProGuard, which also offers code-optimization features. The use of ProGuard or a similar program to obfuscate your code is strongly recommended for all applications that use Android Market Licensing.
When you are finished testing your license implementation, you are ready to publish the application on Android Market. Follow the normal steps to prepare, sign, and then publish the application.
After uploading your licensed application, remember to remove copy protection from the application, if it is currently used. To check and remove copy protection, sign in to the publisher site and go the application's upload details page. In the Publishing options section, make sure that the Copy Protection radio button selection is "Off".
Licensing is currently supported only for paid applications. If you already published your application as free, you won't be able to upload an updated version that includes licensing (that is, an application that uses the same package name and that includes the licensing permission). Here are some points to keep in mind:
If you have questions or encounter problems while implementing or deploying publishing in your applications, please use the support resources listed in the table below. By directing your queries to the correct forum, you can get the support you need more quickly.
Table 2. Developer support resources for Android Market Licensing Service.
| Support Type | Resource | Range of Topics |
|---|---|---|
| Development and testing issues | Google Groups: android-developers | LVL download and integration, library projects, Policy questions, user experience ideas, handling of responses, Obfuscator, IPC, test environment setup |
| Stack Overflow: http://stackoverflow.com/questions/tagged/android | ||
| Accounts, publishing, and deployment issues | Android Market Help Forum | Publisher accounts, licensing key pair, test accounts, server responses, test responses, application deployment and results |
| Market Licensing Support FAQ | ||
| LVL issue tracker | Marketlicensing project issue tracker | Bug and issue reports related specifically to the LVL source code classes and interface implementations |
For general information about how to post to the groups listed above, see Developer Forums document in the Resources tab.
The table below lists all of the source files in the License Verification
Library (LVL) available through the Android SDK. All of the files are part of
the com.android.vending.licensing package.
Table A-1. Summary of LVL library classes and interfaces.
| Category | Name | Description |
|---|---|---|
| License check and result | LicenseChecker | Class that you instantiate (or subclass) to initiate a license check. |
| LicenseCheckerCallback | Interface that you implement to handle result of the license check. | |
| Policy | Policy | Interface that you implement to determine whether to allow access to the application, based on the license response. |
| ServerManagedPolicy | Default Policy implementation. Uses settings provided by the licensing server to manage local storage of license data, license validity, retry. | |
| StrictPolicy | Alternative Policy implementation. Enforces licensing based on a direct license response from the server only. No caching or request retry. | |
| Data obfuscation (optional) |
Obfuscator | Interface that you implement if you are using a Policy (such as ServerManagedPolicy) that caches license response data in a persistent store. Applies an obfuscation algorithm to encode and decode data being written or read. |
| AESObfuscator | Default Obfuscator implementation that uses AES encryption/decryption algorithm to obfuscate/unobfuscate data. | |
| Device limitation (optional) |
DeviceLimiter | Interface that you implement if you want to restrict use of an application to a specific device. Called from LicenseValidator. Implementing DeviceLimiter is not recommended for most applications because it requires a backend server and may cause the user to lose access to licensed applications, unless designed with care. |
| NullDeviceLimiter | Default DeviceLimiter implementation that is a no-op (allows access to all devices). | |
| Library core, no integration needed | ResponseData | Class that holds the fields of a license response. |
| LicenseValidator | Class that decrypts and verifies a response received from the licensing server. | |
| ValidationException | Class that indicates errors that occur when validating the integrity of data managed by an Obfuscator. | |
| PreferenceObfuscator | Utility class that writes/reads obfuscated data to the system's
SharedPreferences store. |
|
| ILicensingService | One-way IPC interface over which a license check request is passed to the Android Market client. | |
| ILicenseResultListener | One-way IPC callback implementation over which the application receives an asynchronous response from the licensing server. |
The table below lists all of the license response codes supported by the licensing server. In general, an application should handle all of these response codes. By default, the LicenseValidator class in the LVL provides all of the necessary handling of these response codes for you.
Table A-2. Summary of response codes returned by the Android Market server in a license response.
| Response Code | Description | Signed? | Extras | Comments |
|---|---|---|---|---|
| LICENSED | The application is licensed to the user. The user has purchased the application or the application is free. | Yes | VT, GT, GR |
Allow access according to Policy constraints. |
| LICENSED_OLD_KEY | The application is licensed to the user, but there is an updated application version available that is signed with a different key. | Yes | VT, GT, GR, UT |
Optionally allow access according to Policy constraints.
Can indicate that the key pair used by the installed application version is invalid or compromised. The application can allow access if needed or inform the user that an upgrade is available and limit further use until upgrade. |
| NOT_LICENSED | The application is not licensed to the user. | No | Do not allow access. | |
| ERROR_CONTACTING_SERVER | Local error — the Android Market application was not able to reach the licensing server, possibly because of network availability problems. | No | Retry the license check according to Policy retry limits. | |
| ERROR_SERVER_FAILURE | Server error — the server could not load the publisher account's key pair for licensing. | No | Retry the license check according to Policy retry limits. | |
| ERROR_INVALID_PACKAGE_NAME | Local error — the application requested a license check for a package that is not installed on the device. | No | Do not retry the license check.
Typically caused by a development error. |
|
| ERROR_NON_MATCHING_UID | Local error — the application requested a license check for a package whose UID (package, user ID pair) does not match that of the requesting application. | No | Do not retry the license check.
Typically caused by a development error. |
|
| ERROR_NOT_MARKET_MANAGED | Server error — the application (package name) was not recognized by Android Market. | No | Do not retry the license check.
Can indicate that the application was not published through Android Market or that there is an development error in the licensing implementation. |
The licensing server includes several settings in certain types of license responses, to assist the application and its Policy in managing access to the application across the 24-hour refund period and other conditions. Specifically, the server provides recommended values for the application's license validity period, retry grace period, maximum allowable retry count, and other settings. The server appends the settings as key-value pairs in the license response "extras" field.
Any Policy implementation can extract the extras settings from the license response and use them as needed. The LVL default Policy implementation, ServerManagedPolicy, serves as a working implementation and an illustration of how to obtain, store, and use the settings.
Table A-3. Summary of license-management settings supplied by the Android Market server in a license response.
| Extra | Description |
|---|---|
| VT | License validity timestamp. Specifies the date/time at which the current (cached) license response expires and must be rechecked on the licensing server. |
| GT | Grace period timestamp. Specifies the end of the period during which a
Policy may allow access to the application, even though the response status is
RETRY. The value is managed by the server, however a typical value would be 5 or more days. |
| GR | Maximum retries count. Specifies how many consecutive RETRY license checks
the Policy should allow, before denying the user access to the application.
The value is managed by the server, however a typical value would be "10" or higher. |
| UT | Update timestamp. Specifies the day/time when the most recent update to
this application was uploaded and published. The server returns this extra only for LICENSED_OLD_KEYS responses, to allow the Policy to determine how much time has elapsed since an update was published with new licensing keys before denying the user access to the application. |
The sections below provide more information about the server-provided settings and how to use them.
The Android Market licensing server sets a license validity period for all downloaded applications. The period expresses the interval of time over which an application's license status should be considered as unchanging and cacheable by a licensing Policy in the application. The licensing server includes the validity period in its response to all license checks, appending an end-of-validity timestamp to the response as an extra under the key "VT". A Policy can extract the VT key value and use it to conditionally allow access to the application without rechecking the license, until the validity period expires.
The license validity signals to a licensing Policy when it must recheck the licensing status with the licensing server. It is not intended to imply whether an application is actually licensed for use. That is, when an application's license validity period expires, this does not mean that the application is no longer licensed for use — rather, it indicates only that the Policy must recheck the licensing status with the server. It follows that, as long as the license validity period is not expired, it is acceptable for the Policy to cache the initial license status locally and return the cached license status instead of sending a new license check to the server.
The licensing server manages the validity period as a means of helping the application properly enforce licensing across the refund period offered by Android Market for paid applications. It sets the validity period based on whether the application was purchased and, if so, how long ago. Specifically, the server sets a validity period as follows:
long.MAX_VALUE). This ensures that, provided the Policy has
cached the validity timestamp locally, it will not need to recheck the
license status of the application in the future.The ServerManagedPolicy implementation uses the extracted timestamp
(mValidityTimestamp) as a primary condition for determining whether
to recheck the license status with the server before allowing the user access to
the application.
In some cases, system or network conditions can prevent an application's license check from reaching the licensing server, or prevent the server's response from reaching the Android Market client application. For example, the user might launch an application when there is no cell network or data connection available — such as when on an airplane — or when the network connection is unstable or the cell signal is weak.
When network problems prevent or interrupt a license check, the Android
Market client notifies the application by returning a "RETRY" response code to
the Policy's processServerResponse() method. In the case of system
problems, such as when the application is unable to bind with Android Market's
ILicensingService implementation, the LicenseChecker library itself calls the
Policy processServerResonse() method with a "RETRY" response code.
In general, the RETRY response code is a signal to the application that an error has occurred that has prevented a license check from completing.
The Android Market server helps an application to manage licensing under error conditions by setting a retry "grace period" and a recommended maximum retries count. The server includes these values in all license check responses, appending them as extras under the keys "GT" and "GR".
The application Policy can extract the GT and GR extras and use them to conditionally allow access to the application, as follows:
The ServerManagedPolicy uses the server-supplied GT and GR values as
described above. The example below shows the conditional handling of the retry
responses in the allow() method. The count of RETRY responses is
maintained in the processServerResponse() method, not shown.
    public boolean allowAccess() {
        long ts = System.currentTimeMillis();
        if (mLastResponse == LicenseResponse.LICENSED) {
            // Check if the LICENSED response occurred within the validity timeout.
            if (ts <= mValidityTimestamp) {
                // Cached LICENSED response is still valid.
                return true;
            }
        } else if (mLastResponse == LicenseResponse.RETRY &&
                   ts < mLastResponseTime + MILLIS_PER_MINUTE) {
            // Only allow access if we are within the retry period or we haven't used up our
            // max retries.
            return (ts <= mRetryUntil || mRetryCount <= mMaxRetries);
        }
        return false;
    }