
Component Workload Emulator (CoWorkEr)
Utilization Test Suite (CUTS)

Quick Start - Introduction
Before beginning this tutorial, you should already be familiar with the following technologies:
- Component Integrated ACE ORB (CIAO)
- Component Synthesis with Model Integrated Computing (CoSMIC)
- Deployment And Configuration Engine (DAnCE)
During this quick start tutorial, you will learn how to do the following with CUTS:
- Add behavior and workload to components
- Prepare model for CUTS emulation
- Generate source code for components
- Run a CUTS emulation
- View performance results using the Benchmark Manager Web Utility (optional)
This quick start tutorial uses the stock quoter example provided with the standard Component Integrated ACE ORB (CIAO) distribution. It is located in $(CIAO_ROOT)/docs/tutorials/Quoter/Simple/Model.
Adding Behavior and Workload to Components
Adding behavior and workload to a PICML model is done using two domain specific modeling langauges (DSMLs) named the Component Behavior Modeling Language (CBML) and the Workload Modeling Language (WML), respectively. Both DSMLs have been integrated into PICML so users can reference the structural model of their systems when modeling the system's behavior and workload. Before we begin adding behavior and workload to the stock quoter example, we first need the following file into GME:
$(CIAO_ROOT)/docs/tutorials/Quoter/Simple/Model/Quoter.xme
Right now, behavior and workload modeling is supported at the component level. In the stock quoter example, we will be adding behavior to both the StockBroker and StockDistrubutor components.
StockBroker behavior
The StockBroker component has the option of manully requesting stock information or automatically receiving periodic updates from the StockDistributor component. We are only going to model behavior for periodically receiving the update information in this tutorial. To insert the necessary behavior, open the StockBroker component located at InterfaceDefinitions/Broker/Stock/StockBroker and select the Behavior aspsect. Then, update the model so that is resembles the one illustrated in Figure 1.
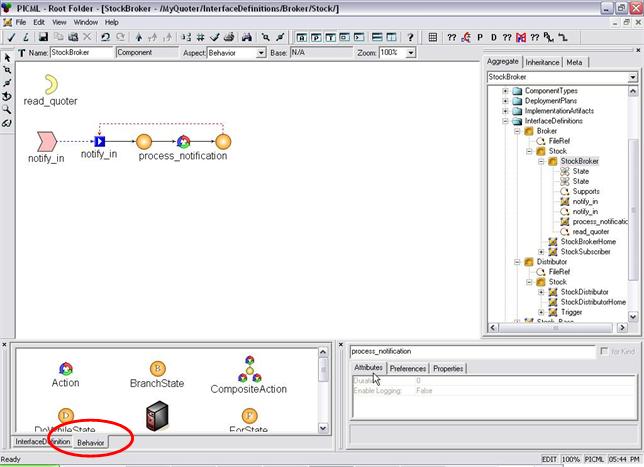
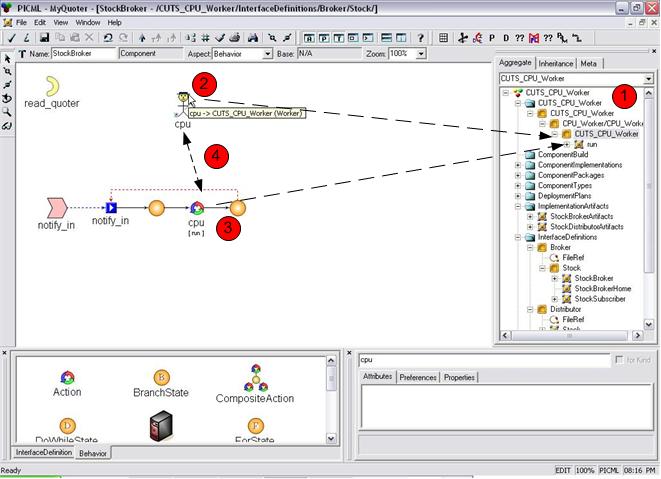
The current model of the StockBroker contains behavior, but no workload. To add workload to the model, we need to parameterize the generic actions with actual workload parameters. We accomplish in a 4 steps:
- Import a workload generator (worker) into the current project. For
this particular example, we imported the workload located at
$(CUTS_ROOT)/cuts/workers/CPU/CUTS_CPU_Worker.xme. - Add a worker to the component's behavior model, which is a GME reference.
- Replace the generic action (e.g., process_notification) with an GME instance of an action (i.e., a workload) from the referenced worker.
- Set the name of the workload to the name of its target worker.
Figure 2 illustrates the final behavior and workload model for the StockBroker.
StockDistributor behavior
The StockDistributor component's behavior is modeled similar to the behavior of the StockBroker component. The StockDistributor component, however, needs to send periodic updates to the StockBroker. We, therefore, need to model this periodic behavior such that the StockDistributor publishes information at the periodicity specified via the rate attribute at deployment and configuration time.
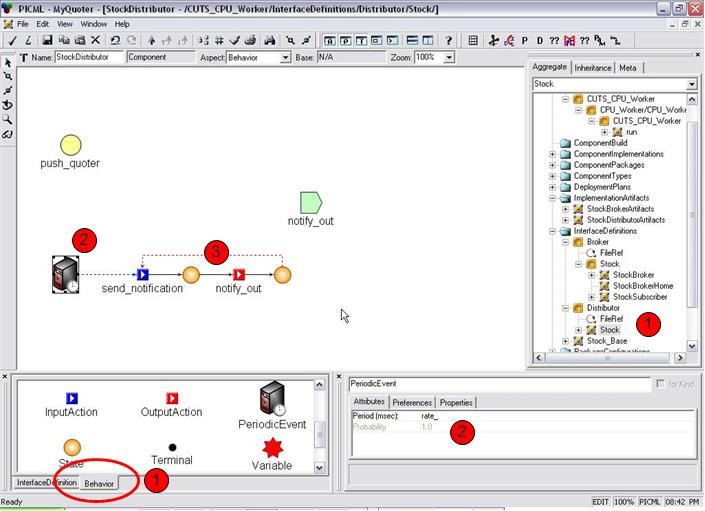
Figure 3 shows the behavior for the StockDistributor, which is modeled as follows:
- Open the StockDistributor component and select the Behavior aspect.
- Insert a PeriodicEvent element into the model and set its Period attribute to rate_. Please note the trailing underscore.
- Create the behavior sequence as shown in Figure 3 for the send_notification behavior. Make sure the names of the elemnts match the names in Figure 3. .
Preparing model for CUTS emulation
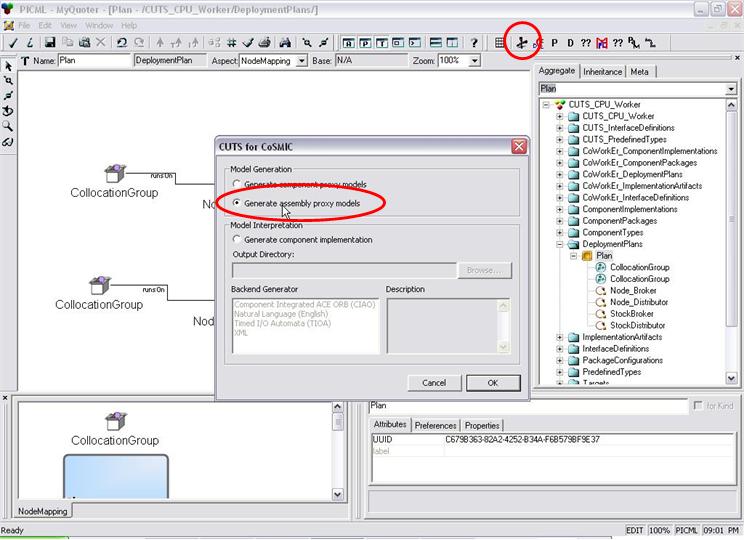
Now that we have modeled the behavior and workload of the components in the stock quoter example, we are ready to prepare the model for CUTS emulation. Run the CUTS interperter (i.e., the interpreter with the scissor icon), and select Generate component proxy models under the Model Generation category as shown in Figure 4.
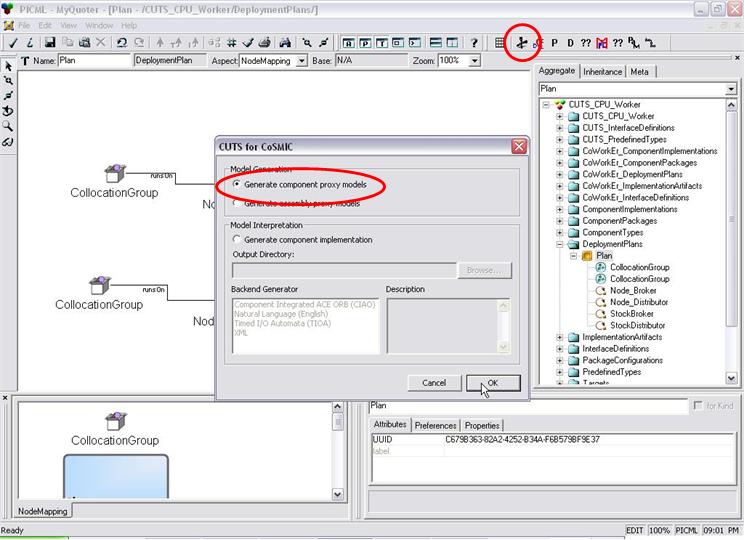
This is generate the necessary model elements for proxying the emulated, or real, components in the stock quoter example. Re-run the CUTS interpreter and this time select Generate assembly proxy models in the Model Generation category as shown in Figure 5.
This step creates a replica of the stock quoter assembly and its deployment(s) using the component proxies. It will also configure the proxies so they will load the correct implementation at deployment and configuration time. The final step is to insert the Benchmark_Data_Collector component into the assembly model and configure its data collection interval and services to load for processing the collected data.
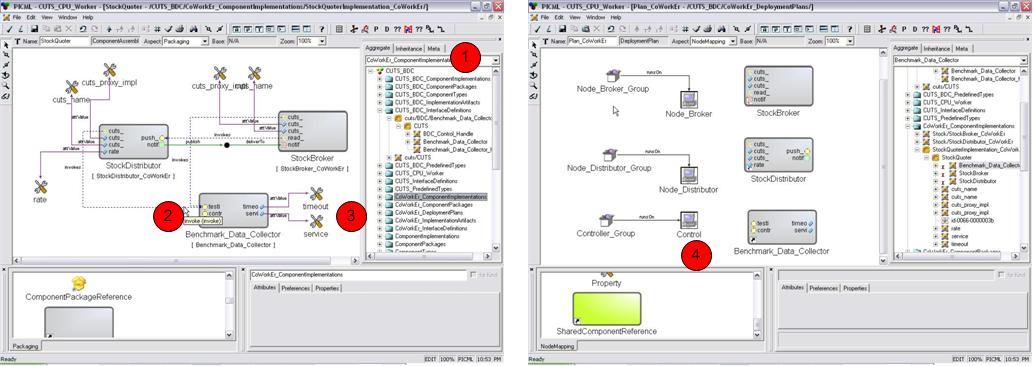
Figure 6 shows the end product for including and configuring the Benchmark_Data_Collector for the stock quoter example, which is done using the following steps:
- Import the Benchmark_Data_Collector model elements located in
$(CUTS_ROOT)/cuts/BDC/BDC.xmeinto the stock quoter example. - Insert an instance of the Benchmark_Data_Collectorcomponent into the stock quoter's proxy assembly diagram.
- Set the timeout attribute value to 30 seconds and the services attribute value to "IO CUTS_BDC_IO --verbose;", but do not include the quotation marks.
- Add the Benchmark_Data_Collector instance to the deployment diagram for the component proxies (i.e., the deployment plans located in CoWorkEr_DeploymentPlans).
In addition to adding the Benchmark_Data_Collector to the stock quoter example, we also set the rate attribute for the StockDistributor to 10000 msec (i.e., 10 seconds).
Generating Source Code for Components
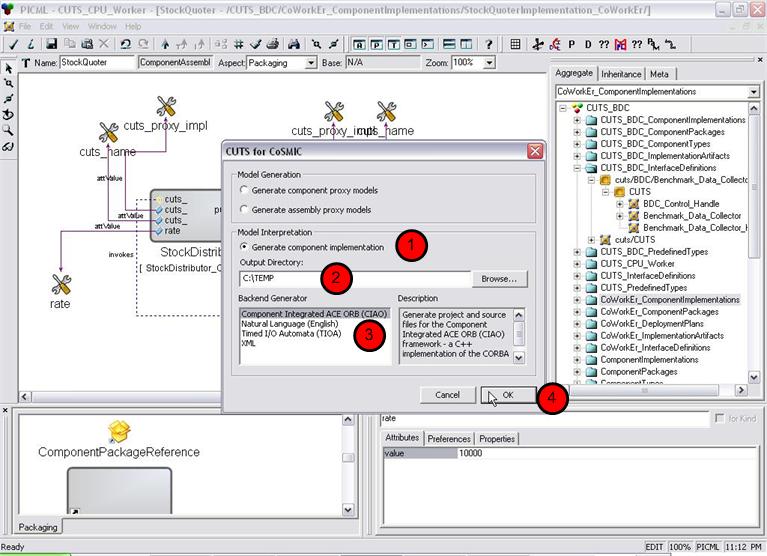
Once the behavior and workload is modeled, and the CUTS-specific model elements are added to the stock quoter model, the next step is to generate source code from the model. This will allow use to run an emulation of the stock quoter system on its target architecture. To generate source code from the model, run the CUTS interpreter again; however, this time execute the following steps (shown in Figure 7):
- Select Generate component implementation
- Enter the target output directory
- Select Component Integrated ACE ORB in the listbox
- Click the OK button
Once the CUTS interpreter finishes generating the source code, the final step is to generate the IDL and CIDL files need to sucessufully compile the source code. These files are created by the IDL Generator and CIDL Generator interpreters provided with CoSMIC. Please make sure to generate the IDL and CIDL files in the same directory as the stock quoter source code previously generated from the model. After generating the IDL and CIDL files, you can compile the source code.
There will be a MyQuoter_CUTS.mwc file (its name may be different) located in the output directory selected from generating the source code. This is a Makefile, Project and Workspace Creator (MPC) workspace file that contains all the necessary information to sucessfully compile the generated source code. Use MyQuoter_CUTS.mwc to generate the appropriate workspace and then compile it.
Running a CUTS Emulation
One of the design goals of CUTS is to reuse the same infrastruture used in the target application. This means that when deploying a CUTS solution, it uses the same deployment tools used in the target application. The stock quoter example uses the Deployment And Configuration Engine (DAnCE) included with the CIAO standard distribution. To deploy the CUTS stock quoter example, do the following:
- Generate the flat deployment plan descriptors from the stock quoter model. You can find instructions on generating the flat deployment plans in the original stock quoter tutorial included with CoSMIC.
- Use DAnCE to deploy the Plan_CoWorkEr.cdp. The original stock quoter tutorial has instructions on how to deploy the solution. Be sure, however, to update the NodeMap.dat file to contain the control node needed by the Benchmark_Data_Collector.
Viewing Results Using the Benchmark Manager Web Utility (optional)
Coming soon...